商用利用って可能なの?
NovelAIの使い方を知りたい!
NovelAIはサブスクの有料プランに加入することで画像生成することが可能です。
Stable Diffusionと同じように
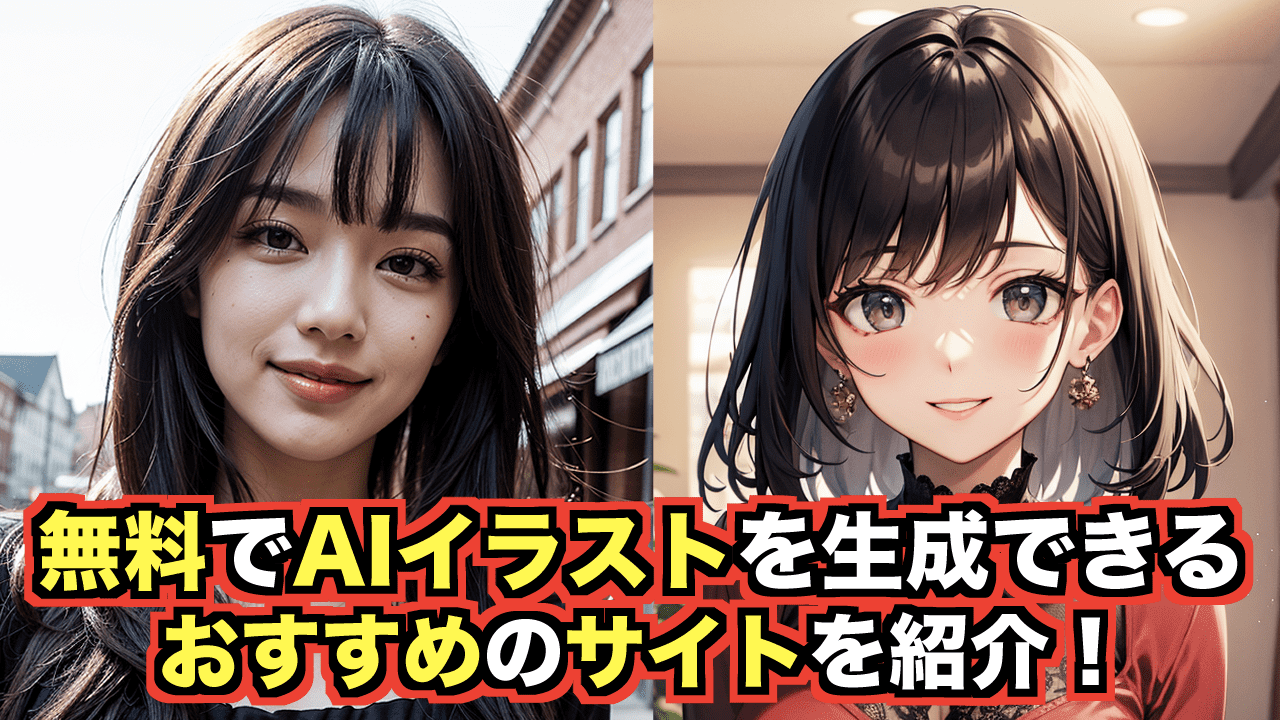
クオリティの高い可愛いアニメ風の画像生成ができるのでオススメです。
この記事ではNovelAIの使い方について詳しく解説します。
まだ有料プランに加入していない方は以下の記事で解説しているので合わせて読んでみてください。
NovelAIとは?
NovelAIは2022年の10月3日から画像生成ができるようになりました。
質の高い画像生成がされるので非常に多くの方が使っているAIイラストメーカーです。
画像生成だけでなく小説も生成可能です。
小説では一部無料になっていますが画像生成の無料版はなく
有料プランに課金しないとAIイラストを生成することができません。
画像生成する時にはAnlasと呼ばれるクレジットのようなものを消費することで可能になります。
リアル(実写)の生成は苦手ではありますが
アニメ風の画像生成は非常にクオリティが高いのでおすすめです。
商用利用について
NovelAIは「商用利用可能なの?」と思うかもしれません。
結論から言いますと商用利用可能です。
NovelAIのトップサイトにある一番下の「Terms of Service」をクリックすると
利用規約を確認できるのでチェックしておきましょう。
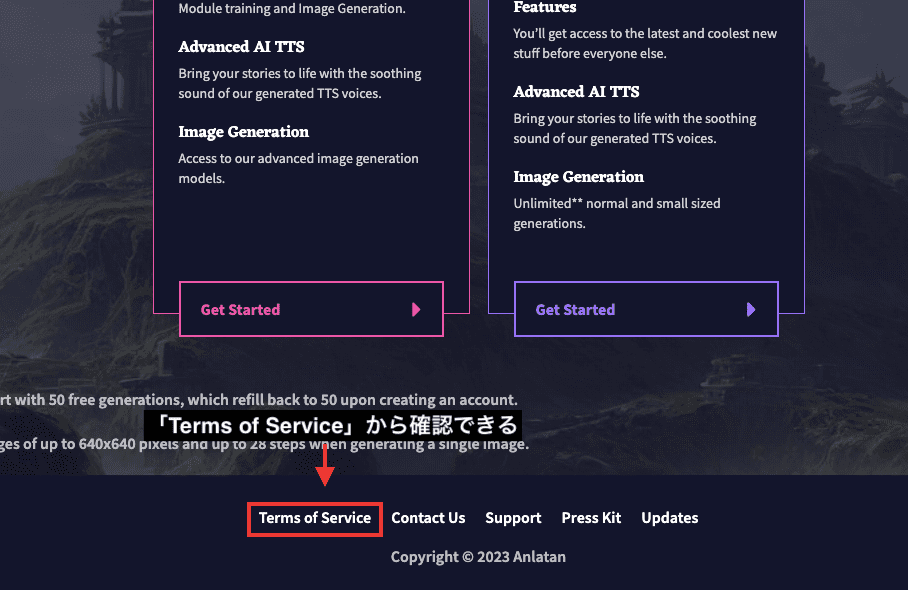
以下に作品を生成した人は個人・法人問わず権利・所有権を保有することが書かれています。
コンテンツとは生成させた作品のことを指しています。

スマホにも対応している
AIイラストメーカーの1つであるStable DiffusionではGPU搭載の高スペックPCや面倒なgoogle colabなどを通してから使う必要があります。
ですが、NovelAIはPCを持つ必要はなくスマホからでも画像生成することが可能です。
どこからでもログインして手軽にクオリティの高いアニメ風の画像生成ができるので便利です。
日本語に設定する方法
初期設定は英語になっているのですが日本語に変更する方法があり、2つのやり方があります。
ログイン後から変更する
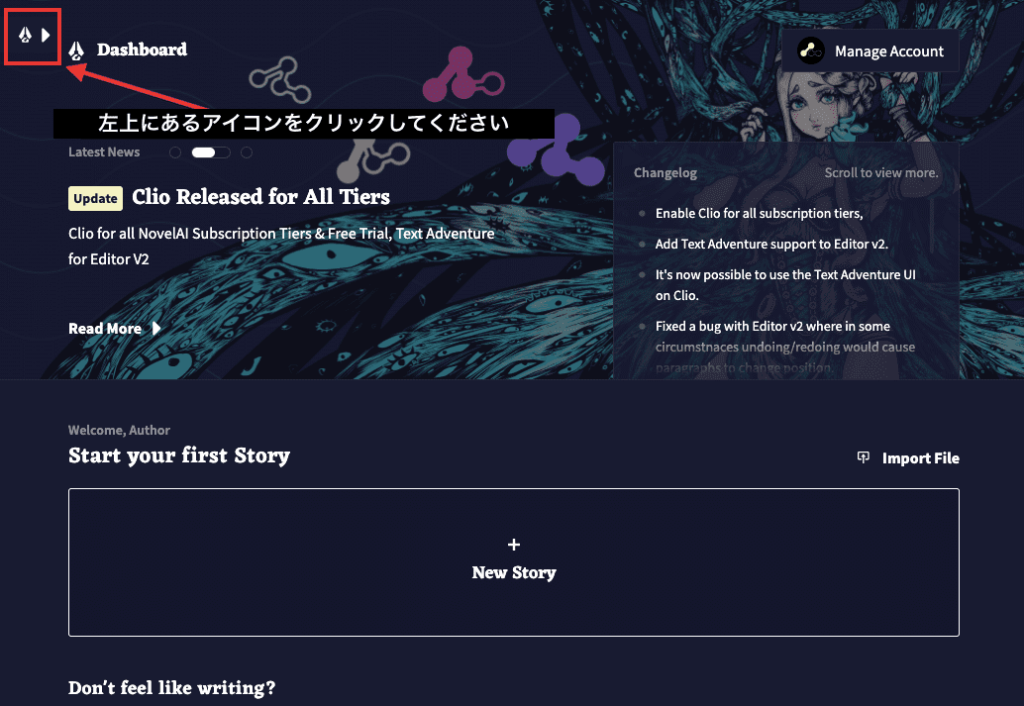
1つ目の方法は、ログイン後にある左上の筆アイコンをクリックしてください。
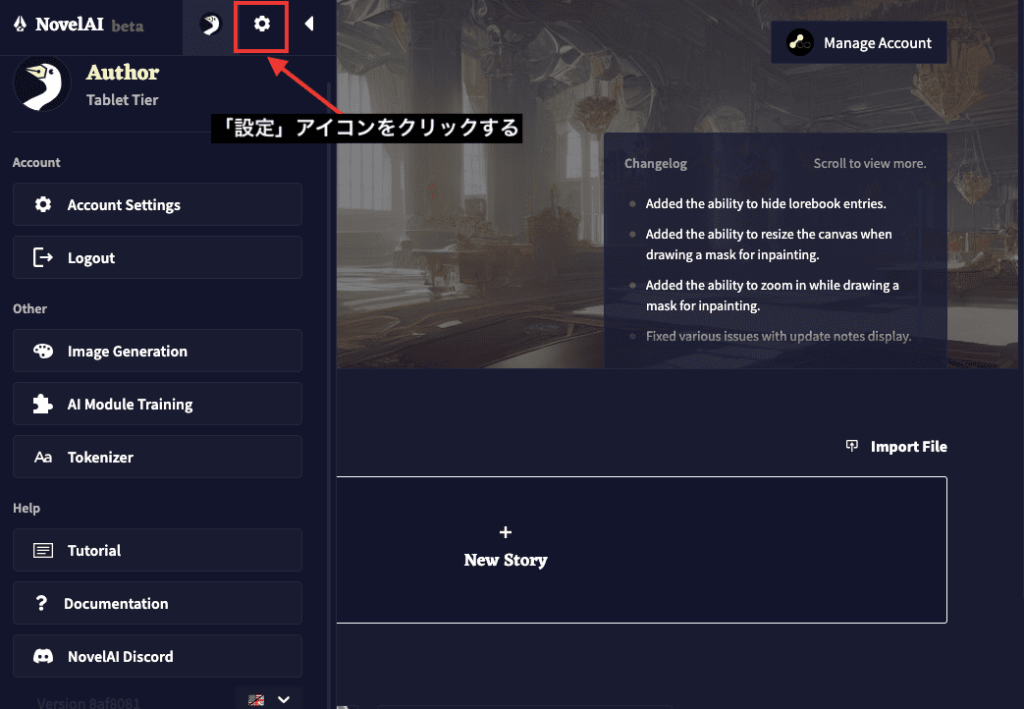
上部にある「設定」アイコンを押してください。
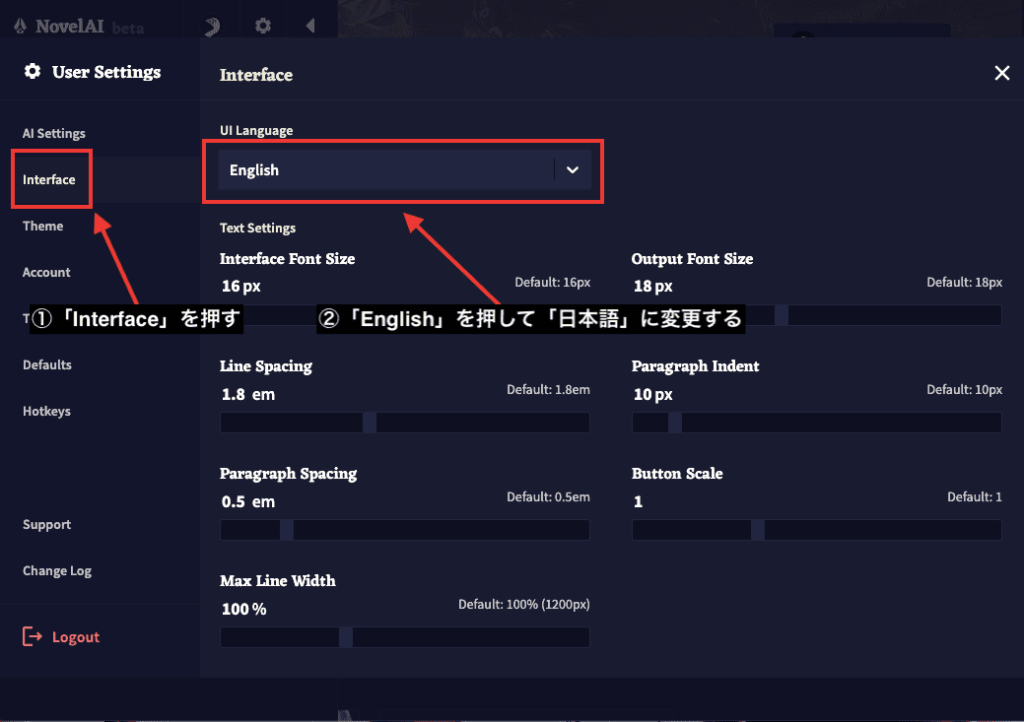
左側にある「Inter face」項目をクリックしてからUI Languageにある「English」を「日本語」に変更することで可能になります。
NovelAI Diffusionから変更する
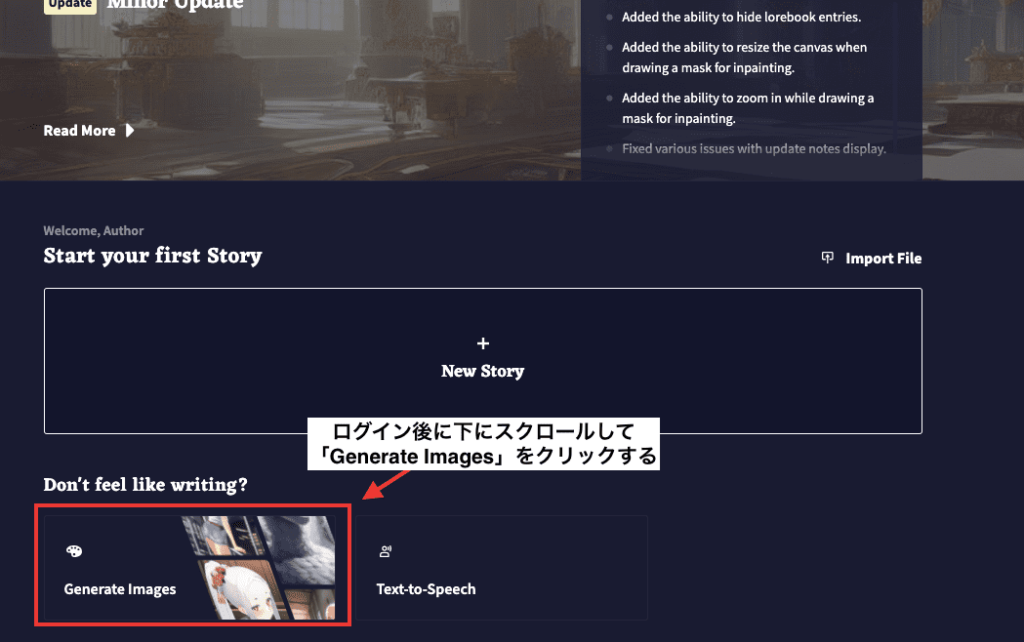
2つ目の方法はログイン後に下にスクロールしてから「Generate Images」をクリックしてNovelAI Diffusionに入ってください。
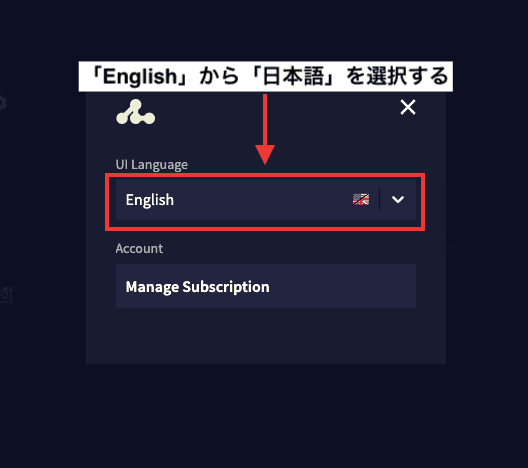
上部にあるアカウントアイコンをクリックしてください。

「English」から「日本語」を選択することで変更が可能になります。
Anlasについて
Anlasは画像生成する際に消費するクレジットのような要素になっています。
画像サイズを上げたり1度の画像生成枚数を上げると消費数が異なるのでよく確認しましょう。
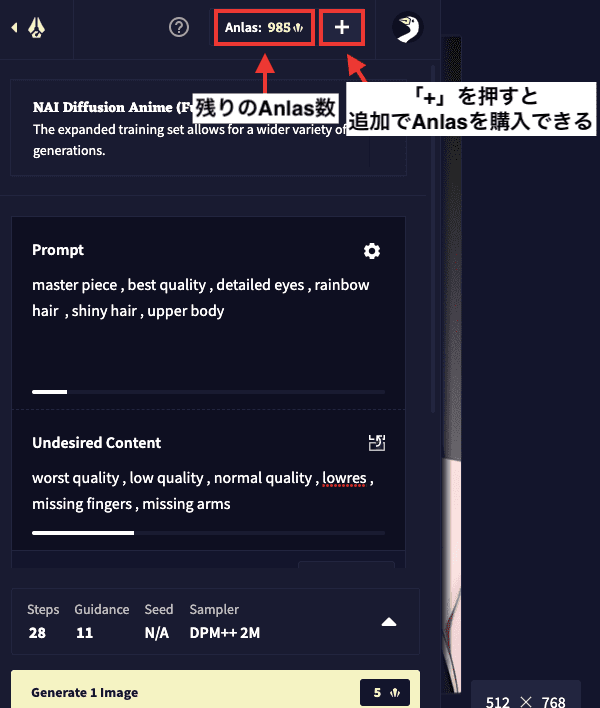
残りのAnlas数は上部にある「Anlas」から確認できます。
この例ですと「985」残っています。
右にある「+」を押すことで追加でAnlasを購入することが出来ます。
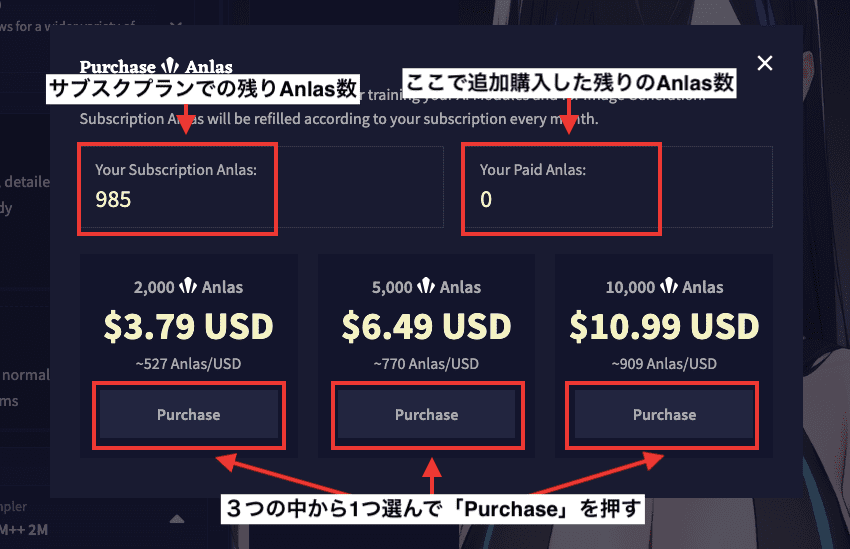
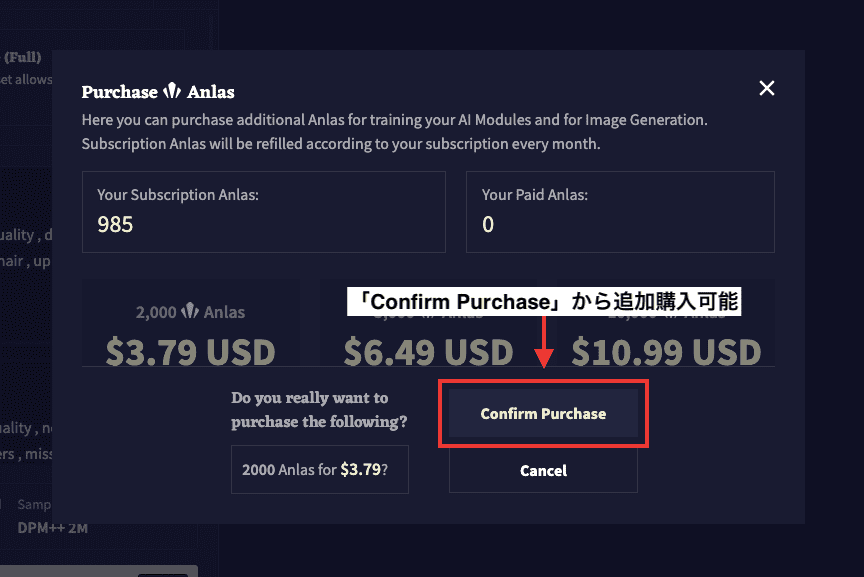
「Your Subscription Anlas:」ではサブスクプランでの残りAnlas数になっています。
「Your Paid Anlas:」では追加購入した残りのAnlas数になっています。
購入する場合は以下の3つの中から1つを選択して「Purchase」を押してください。
「Confirm Purchase」から追加購入可能です。
モデルについて
モデルを選択する場合は左上にある「NAI Diffution Anime(Curated)」の右側にある「下矢印」ボタンを押してください。
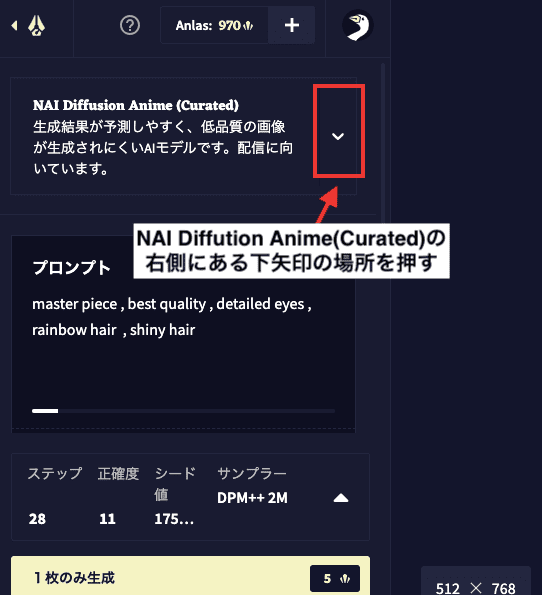
3つのモデルを選択することが出来ます。
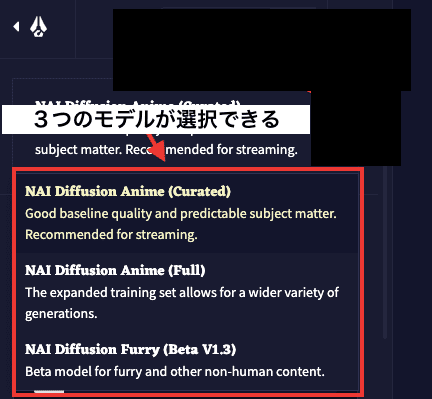
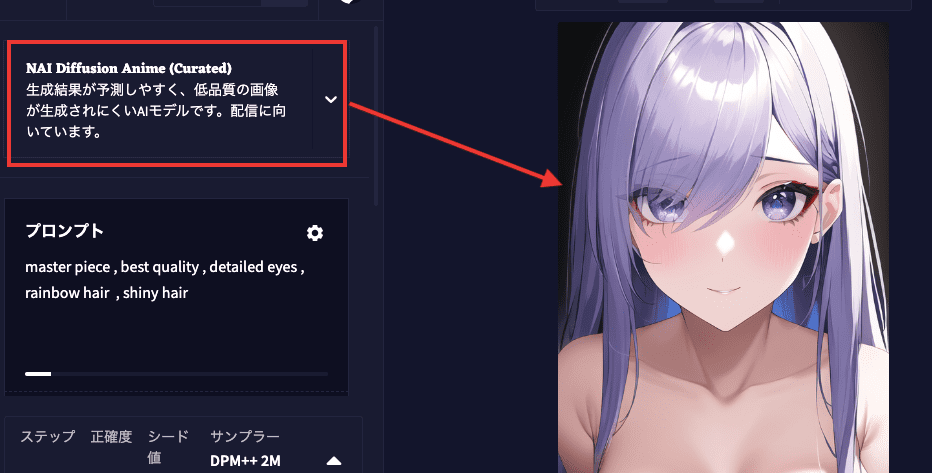
NAI Diffusion Anime(Curated)で生成した結果は以下になります。
画像生成したいイメージに沿って作成されやすい傾向にあります。
要は頭の中で考えている想像通りに生成されます。
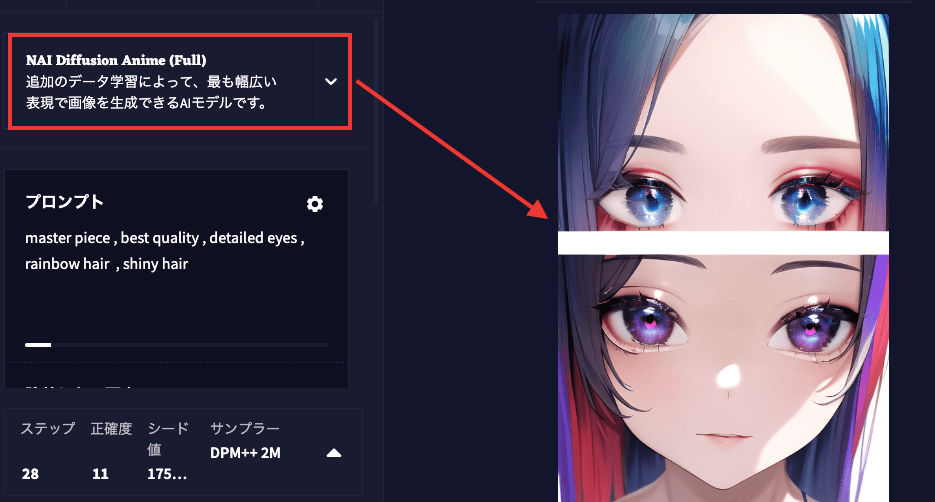
NAI Diffusion Anime(Full)で生成した結果は以下になります。
プロンプト内容に従ってはいますが、目に対してアップしている構図の画像が出てきました。
NAI Diffusion Anime(Curated)よりも表現方法が広く、予想外な生成がされやすい傾向にあると感じました。
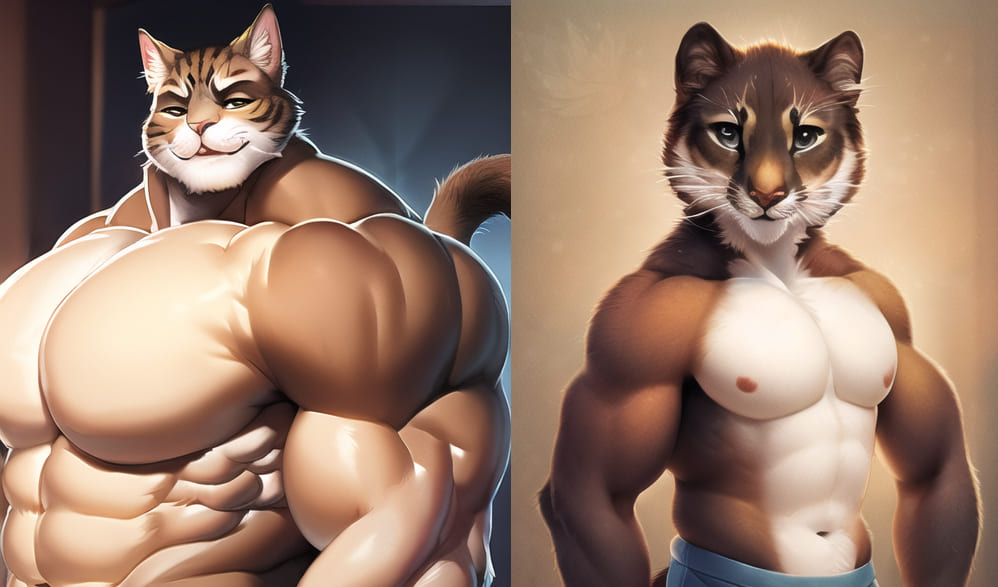
NAI Diffusion Furry(Beta V1.3)で生成した結果は以下になります。
人ではなく動物のキャラクターになりました。
人以外の何かを作成したい場合は、このモデルを使用した方が良い作品になりやすいと思います。
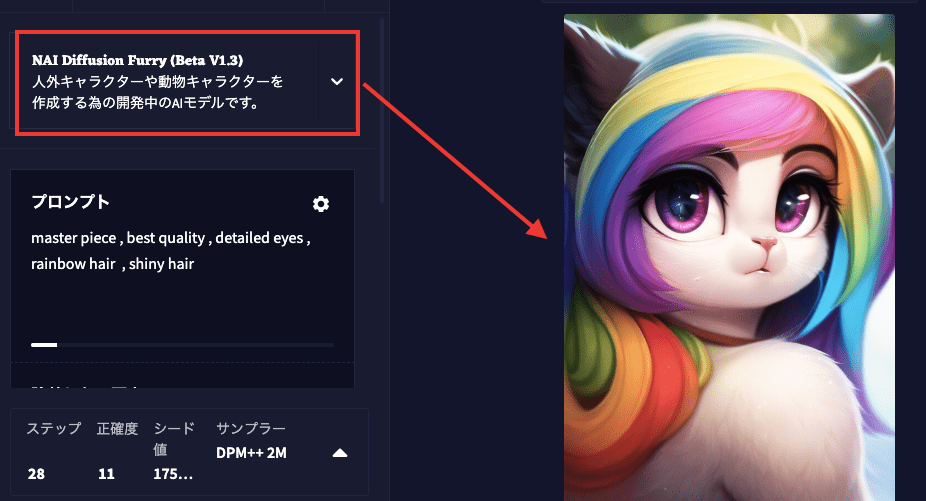
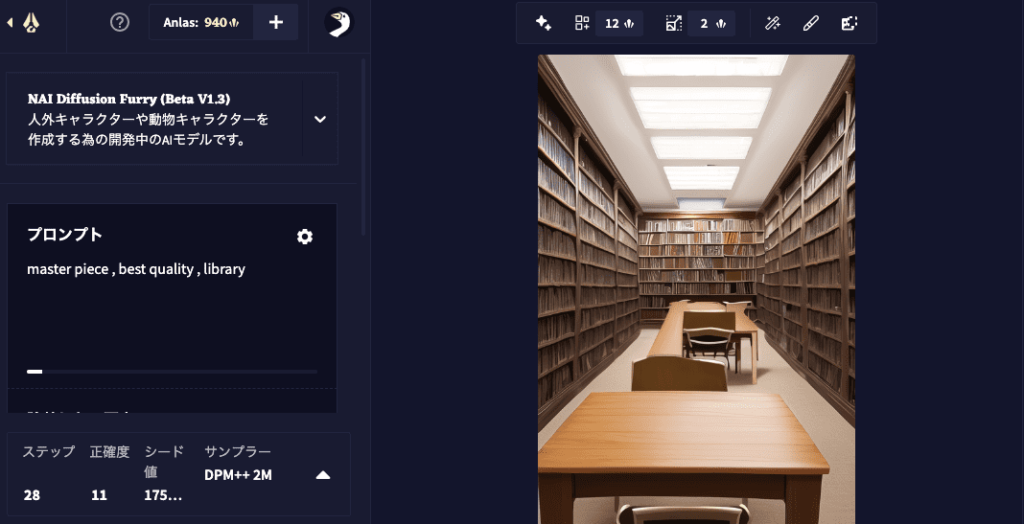
また、背景のみを作成したいにも適しています。
以下では図書館のみを指定して生成しました。
NAI Diffusion Anime(Curated)では人物も一緒に生成されやすい傾向にあるので、背景・風景のみを作成する時はこのモデルを使用した方がいいです。
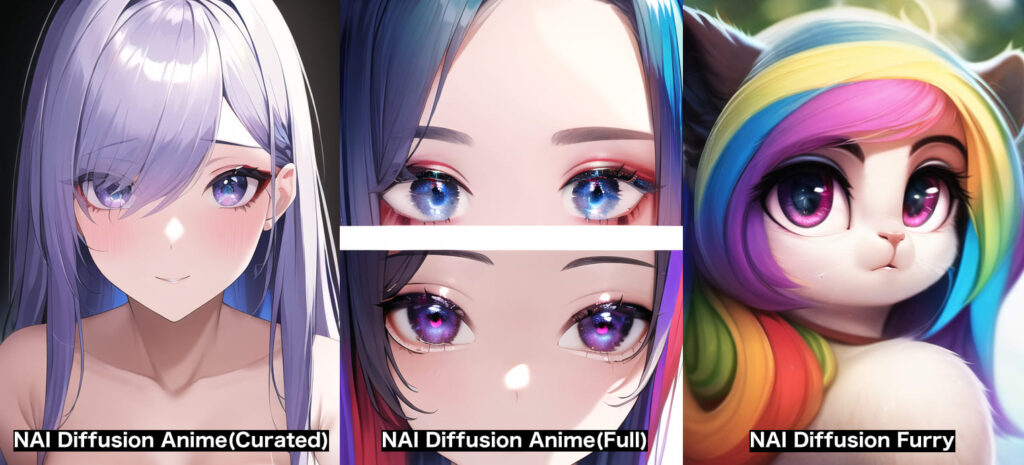
以下の画像では、3つのモデルを同じプロンプト内容と固定Seed値にして生成した結果になります。
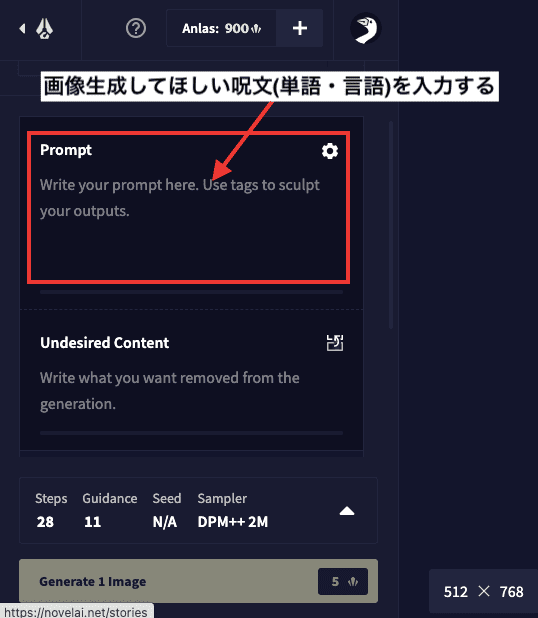
Promptについて
Prompt内では画像生成してほしい呪文(単語・言語)を入力する場所になっています。
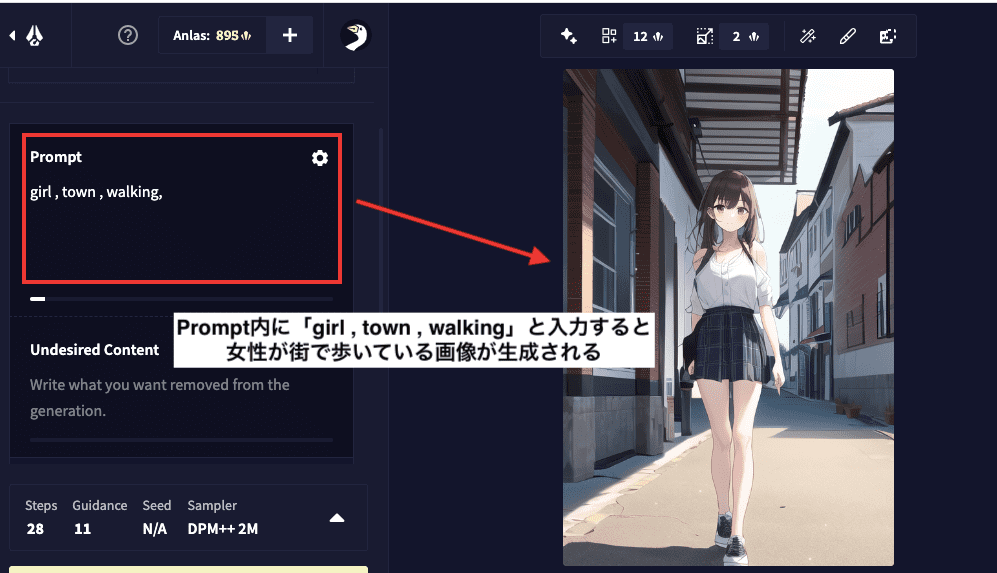
例えば「girl , town , walking」と入力すると、女性が街で歩いている画像を生成することが出来ます。
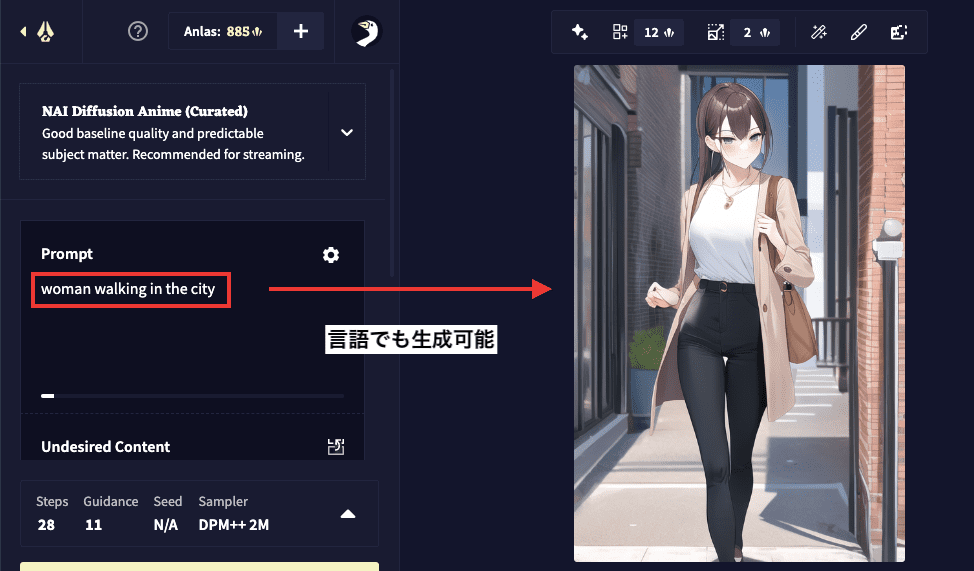
先ほどは単語で「,」で区切って入力していましたが、言語でも画像生成されるのでイメージした生成がされやすい方法を使用しましょう。
私の場合ですが、単語の方が何を入れているのか分かりやすいので言語ではなく単語で入れています。
Promptの右側にある「設定」アイコンをクリックして、一番上にある「Add Quality Tags」をONにすることで、プロンプト内に自動で品質を上げるための呪文が入力されます。(自動で入力された呪文内容は見えません)
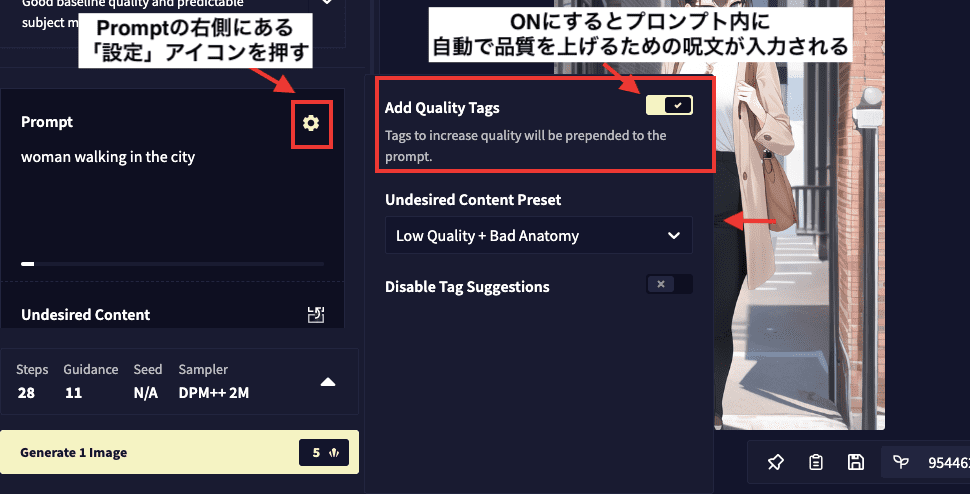
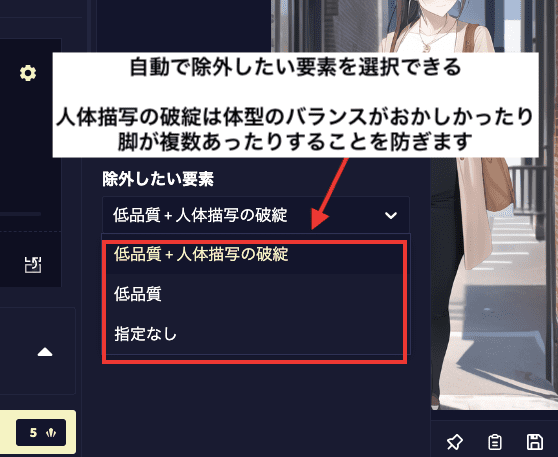
2番目にある「除外したい要素」では「低品質+人体描写の破綻」を選択すると、低品質な生成と体型のバランスがおかしかったり脚が複数あったりする画像生成を防ぎやすくさせます。
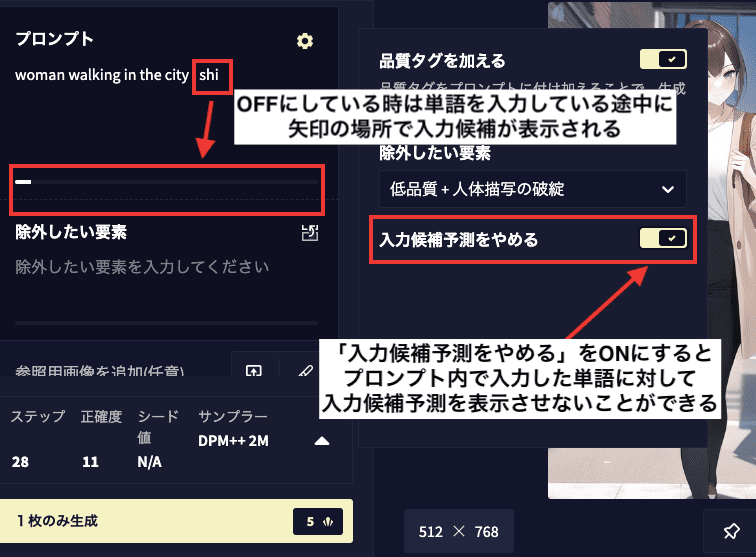
「入力候補予測をやめる」をONにすると、プロンプト内で単語を入力している途中で入力候補予測を表示させないようにすることが出来ます。
Undesired Content(ネガティブプロンプト)
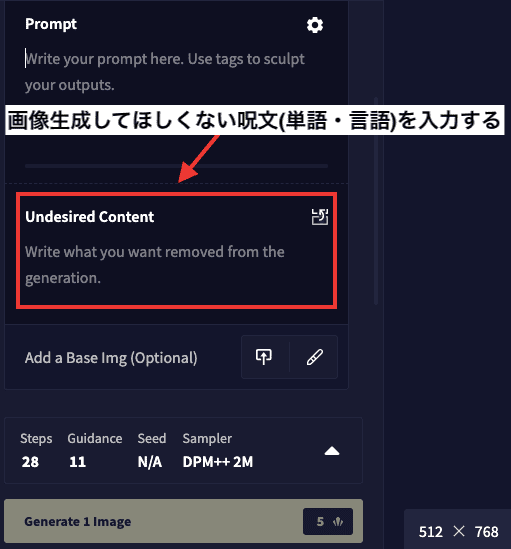
「Undesired Content」では、画像生成して欲しくない呪文(単語・言語)を入力する項目になります。
Stable Diffusionで言うとネガティブプロンプトの場所になっています。
例えば、Prompt内に「遊園地」の単語を入れて生成した時に観覧車が写った遊園地が画像生成されたとします。
観覧車を省きたい思った時にUndesired Content内に「観覧車」の単語を入れることによって省くことが出来ます。
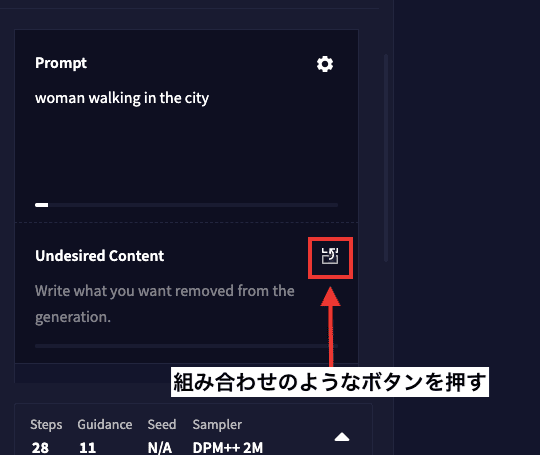
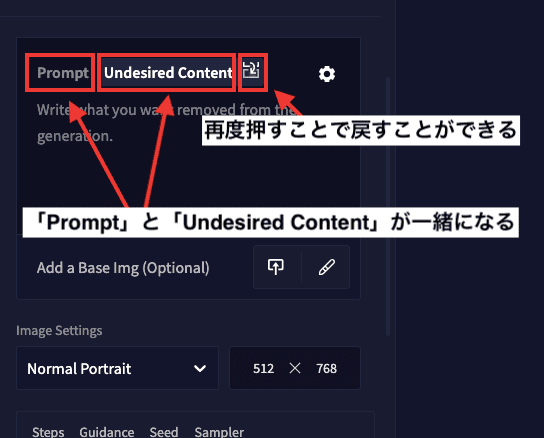
Undesired Contentの右側にある組み合わせのようなボタンをクリックすると、Promptの右側の場所にタブが移動します。
以下の画像のように、PromptとUndesired Content(ネガティブプロンプト)が一緒になっています。
右側にあるアイコンを再度クリックすることで元に戻すことが出来ます。
画像生成する方法
画像生成する場合は左下にある「Generate」ボタンをクリックすることで生成することが可能です。
ボタンの右側にあるのは1枚の生成で消費されるAnlas数になります。
以下の画像の例では「5」Anlas消費されます。

画像のダウンロード
生成した画像をダウンロードしたい時は、画像表示場所にある右下のディスクアイコンをクリックするとダウンロードすることが出来ます。

過去に生成した画像を確認する
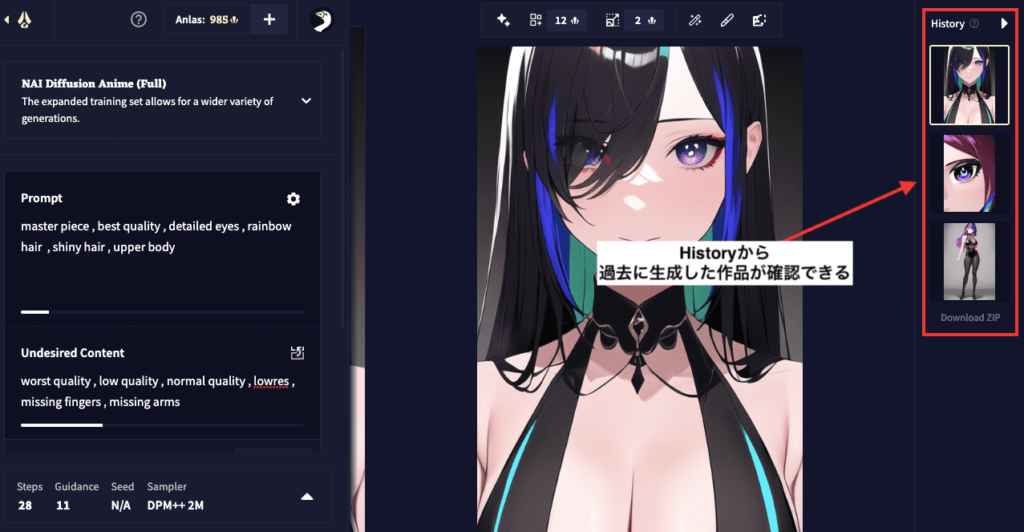
今まで生成した画像を見たい場合は右上にある時計アイコンをクリックしてください。
Historyから過去に生成した作品を確認することが出来ます。
画像生成後の注意点
ブラウザを閉じたり、ログイン場所のページに戻ってしまうとHistory内にある生成した画像は全て削除されるので良いと思った画像は保存しておくようにしてください。

img2img(画像から画像)を使う
Img2img(画像から画像)はイメージに合った参照画像を使って似たような特徴の画像生成をさせることが出来ます。
Img2imgを使うとスペックによってはCPUが100%を超える負荷をかける場合があり、PCのファンが回りやすくなって凄く動きが重くなるので注意しましょう。
私はMacbook airを使用していたのですがCPUが常に100%を超えている状況でした。
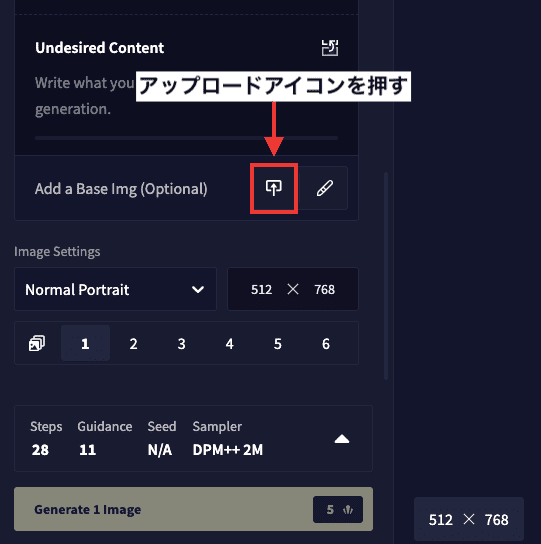
img2imgを使う場合は「Add a Base Img(Optional)」の右側にあるアップロードアイコンをクリックしてから画像の読み込みをしてください。
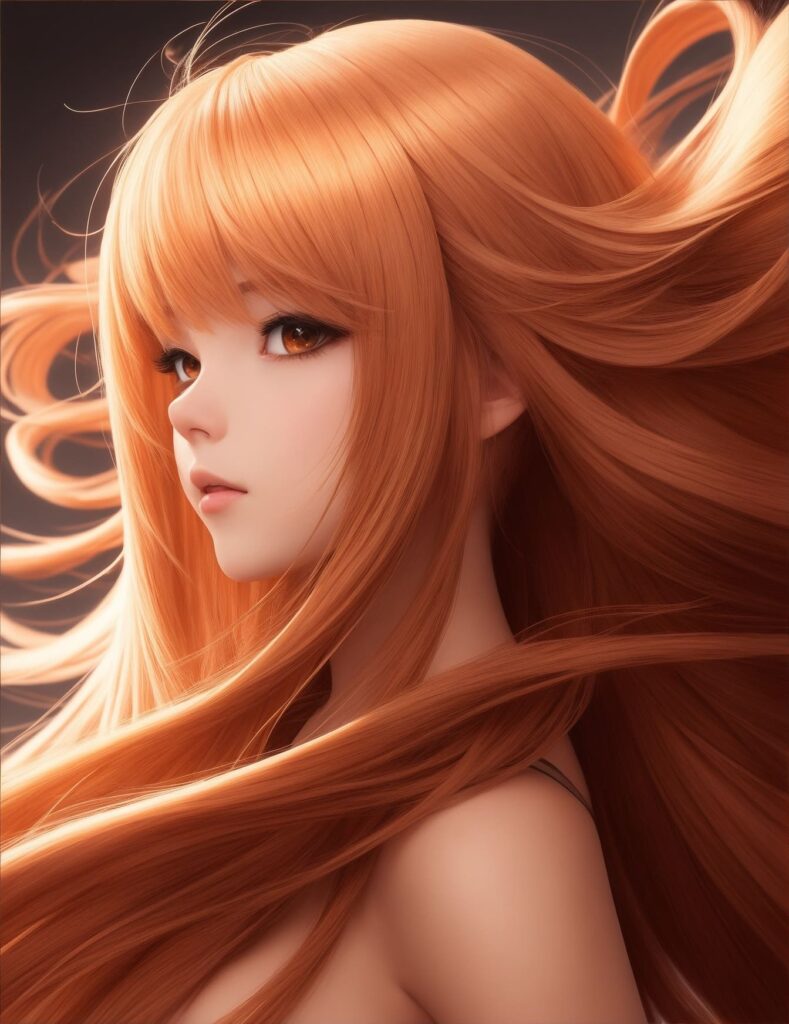
今回の例では、以下の画像をアップロードしました。
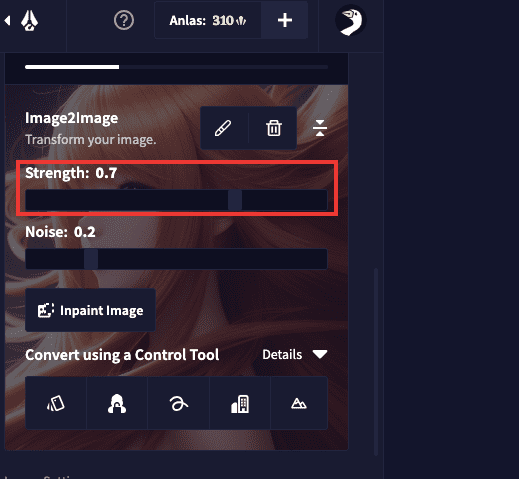
Strength
Strengthの項目では「0.1〜0.99」まで設定可能です。
画像の特徴を維持したい場合は数値を低くしてください。
数値を大きくすると画像の特徴から離れていきます。
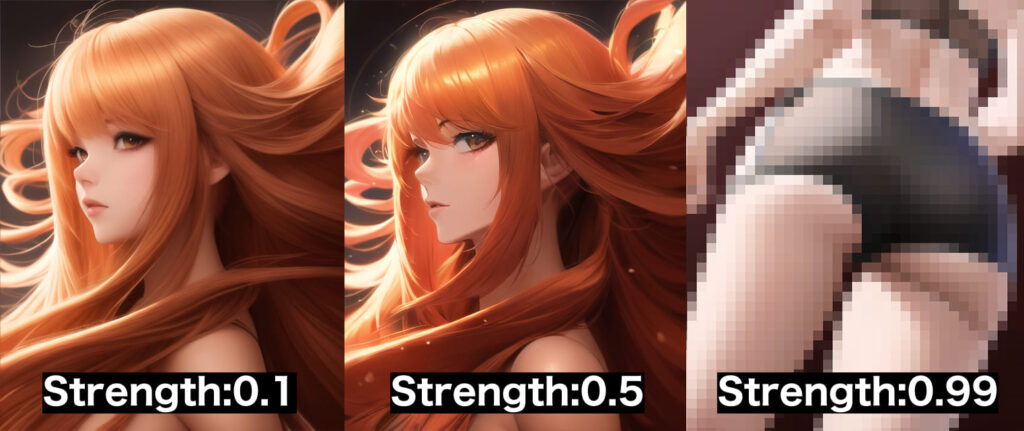
Strengthの数値を「0.1」「0.5」「0.99」で設定した比較画像が以下になります。
「0.1」ではほとんど同じであり、「0.99」の数値では後ろ姿になっており全く特徴を維持していません。
特徴を維持しつつ少し変化をさせたい場合のおすすめの設定値としては「0.5〜0.7」くらいで合わせた方がいいです。
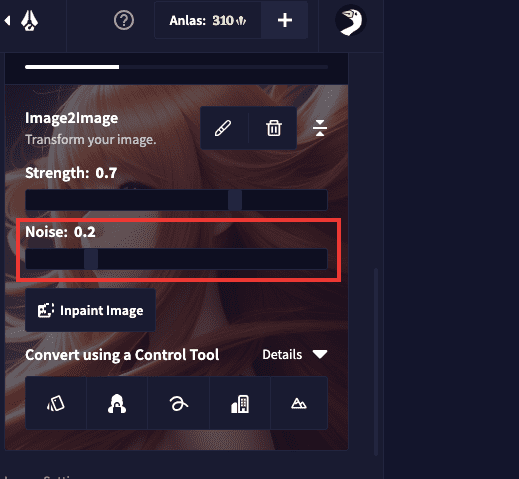
noise
Noise項目では「0.1〜0.99」まで設定することが可能であり、数値を低くするほど品質が低くなり、高いほど質が高くなりやすい傾向にありました。
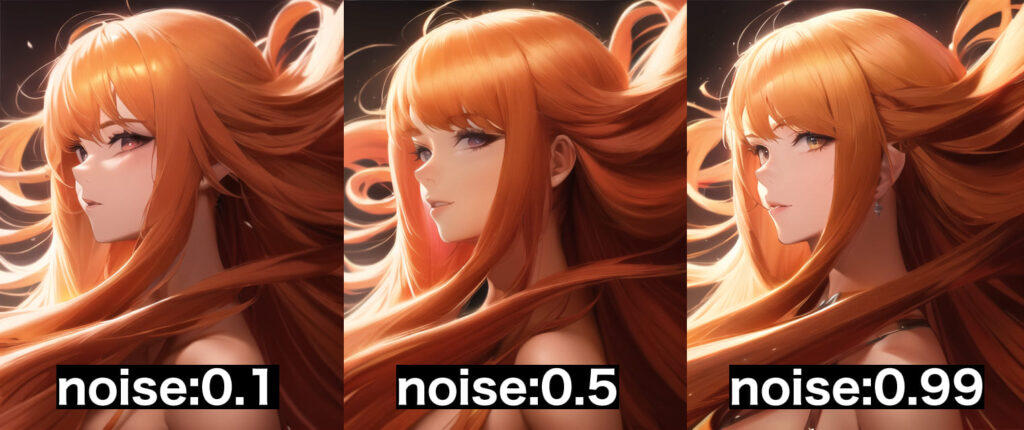
Noise数値を「0.1」、「0.5」、「0.99」で設定した比較画像が以下になります。
最大値の「0.99」が全体のバランスが整っていて一番質が高く見えます。
質の高い画像生成がされやすいオススメの設定値としては「0.5」以上になります。
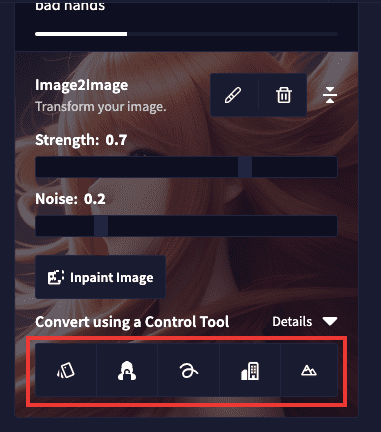
Convert using a Control Tool
Img2img2の下部にあるConvert using a Control Toolでは5つの項目があり、使用することで画風を変えることが出来ます。
左から一つずつ解説していきます。
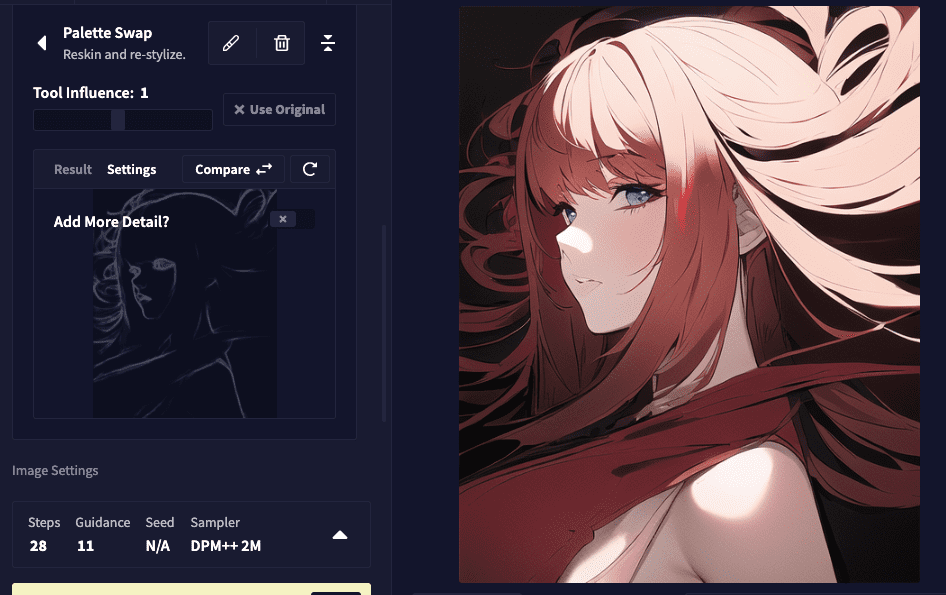
Palette Swap
元画像の線画を抽出してから再度画像生成させている方法になります。
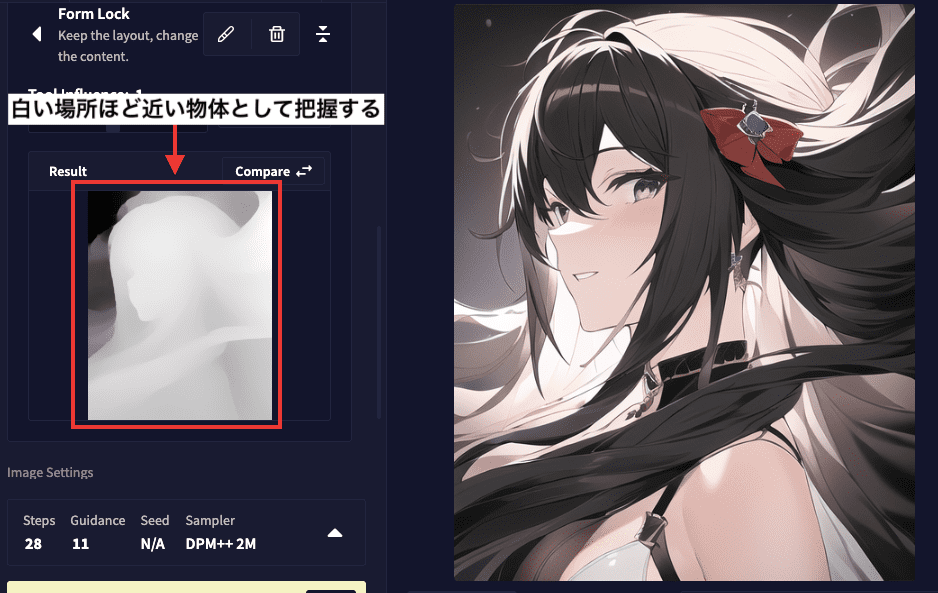
Form Lock
元画像の被写体深度の輪郭部分を把握して再度画像生成させている方法だと思います。
被写体深度は白い場所ほど近い物体として把握していて黒い場所ほど遠い距離になっています。
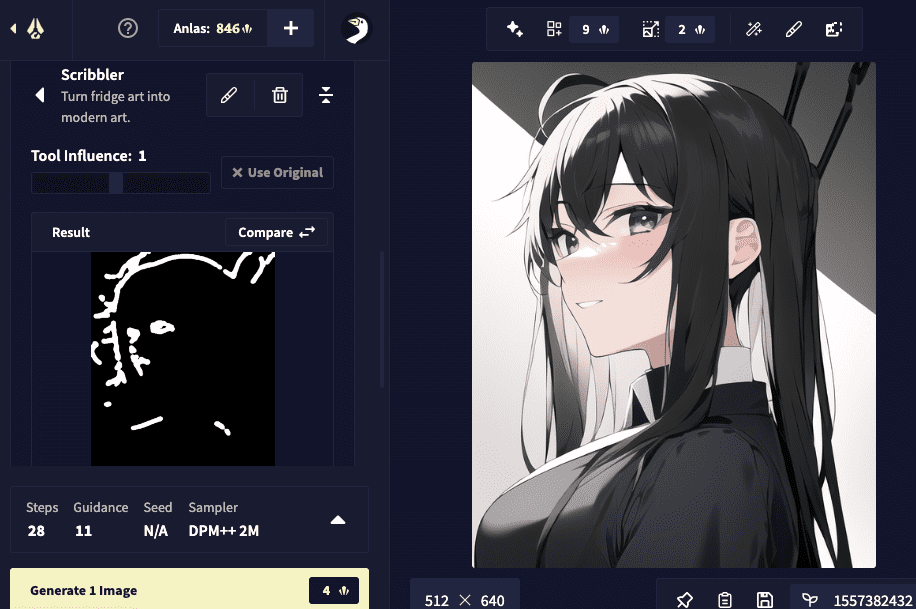
Scribbler
私個人のオススメはScribblerになります。
Palette Swap、Form Lockと比べると全体的にバランスが整いやすく質が高いです。
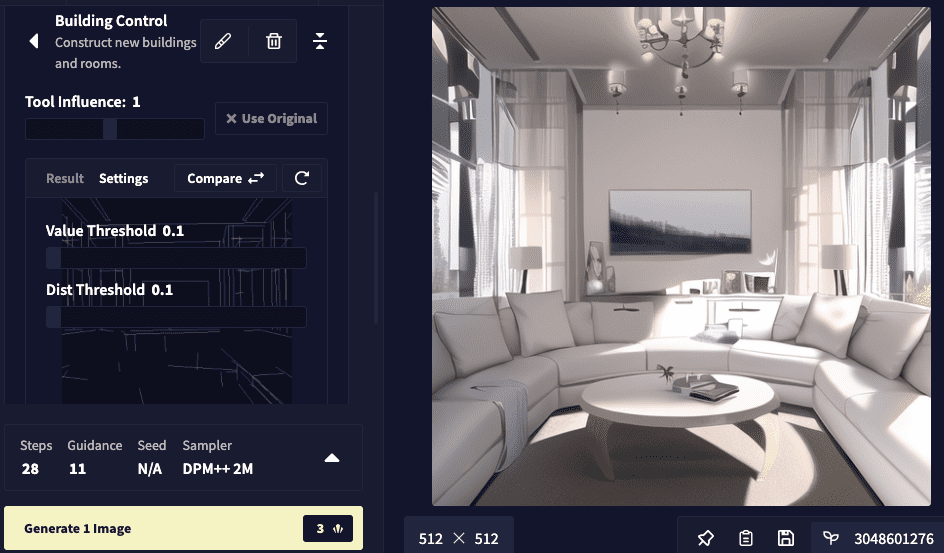
Building Control
直線部分の線を抽出して新しく画像を生成する機能になっています。
建物や部屋内の画像などに対して使用した方がいいです。
今回の例では以下の部屋の画像を使用します。
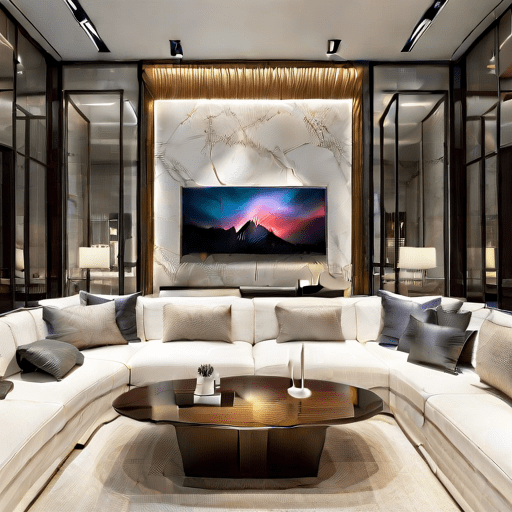
画像生成した結果が以下になります。
元画像と似たような雰囲気で別の画像を生成することが出来ています。
Building Controlは人ではなくほとんど直線で描かれている建物や部屋内の画像などで使用する項目と覚えておきましょう。
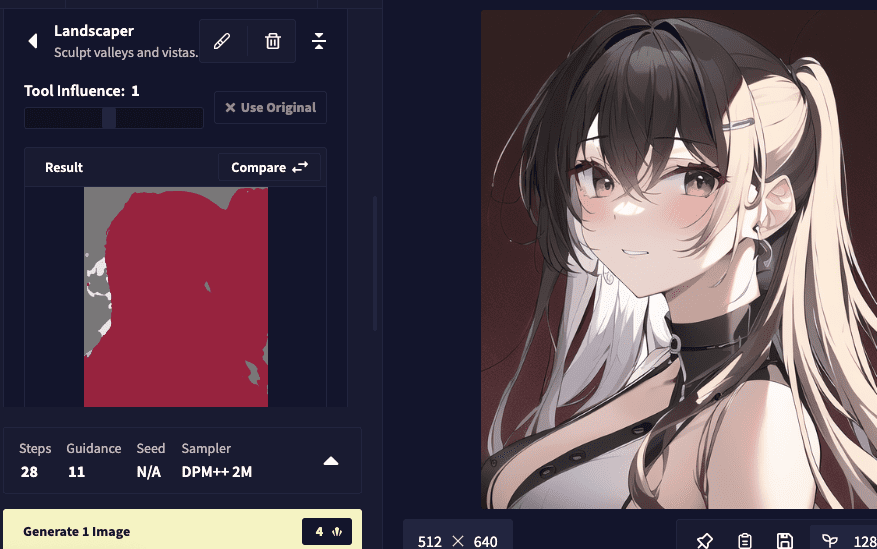
Landscaper
物体を色分けで抽出して再度生成している方法だと思います。
以下では人物を元にして生成した結果になります。
以下では部屋の中を元画像にして画像生成した結果になります。
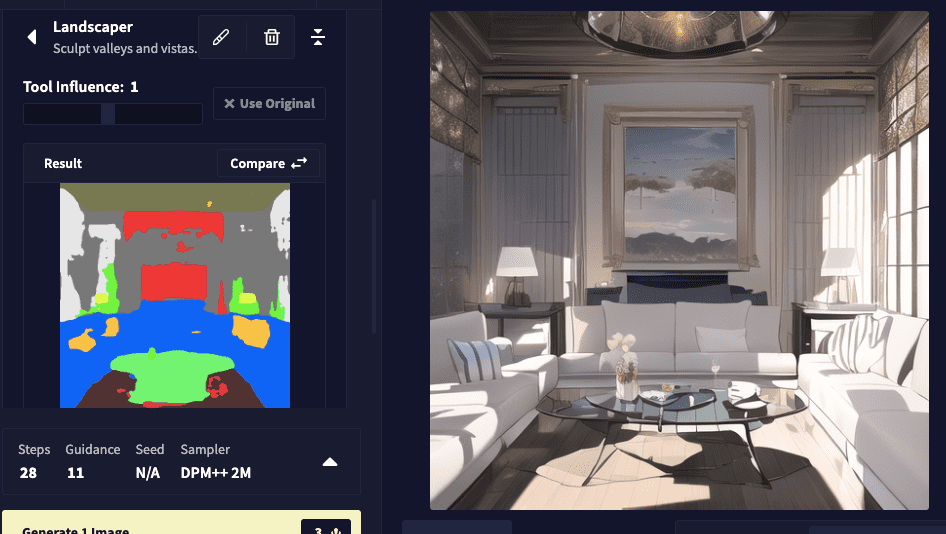
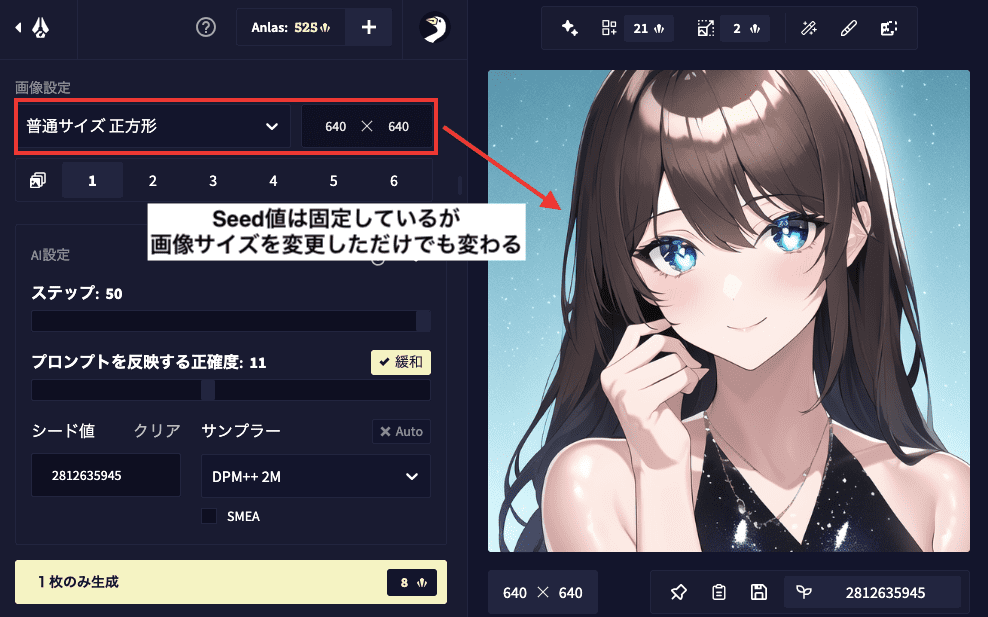
Image Settings
①アスペクト比率の変更
②画像サイズを指定して変更
③1度に画像生成する枚数の変更
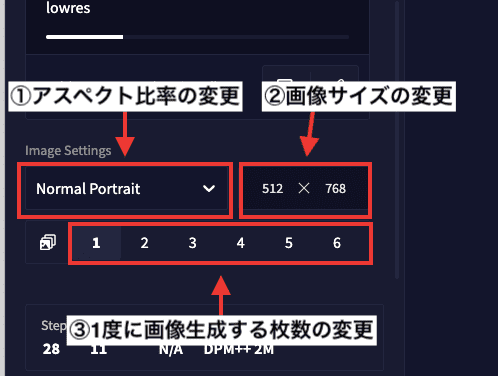
画像サイズや生成枚数を変更すると画像生成する時のAnlas数の消費量が変わるので確認しましょう。
試して見るとイメージに合った画像生成ができる可能性があります。
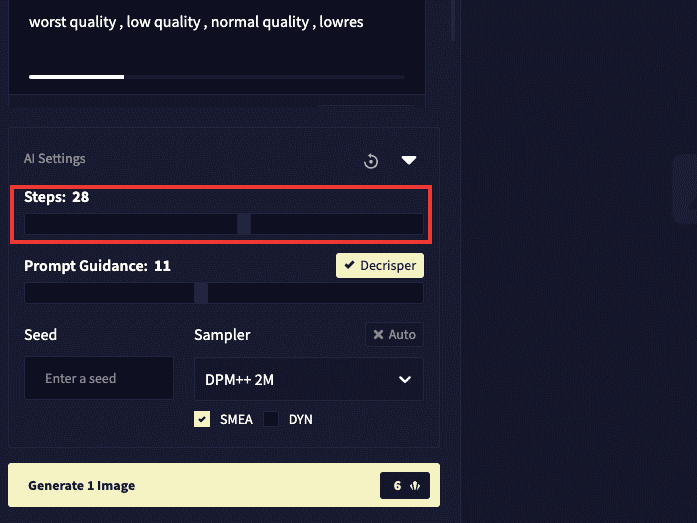
AI Settings
Steps
画像のノイズ除去を行う回数です。
回数が低いほど質が低くなりやすく、大きいほど質が高くなりやすい傾向にあります。
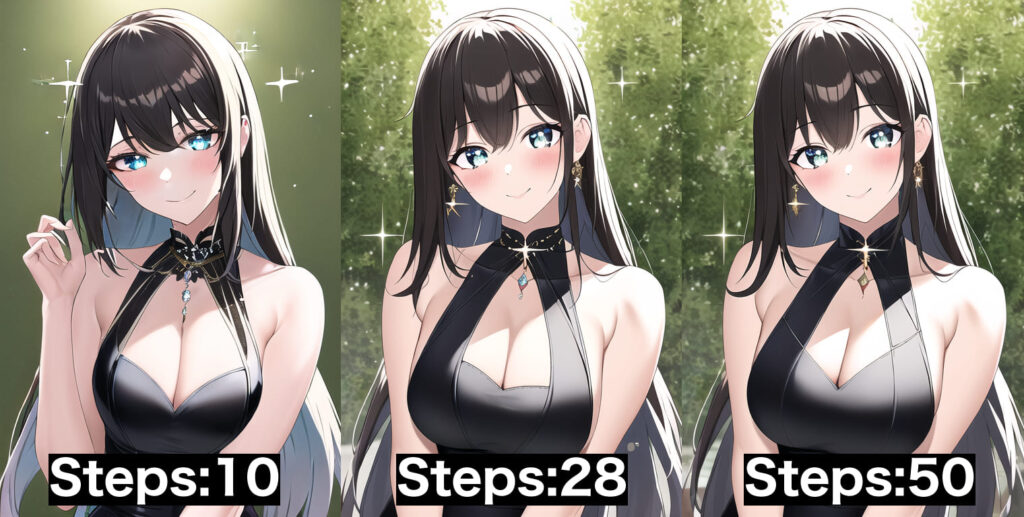
以下ではsteps数値を「10」、初期設定の「28」、「50」で比較した結果になります。
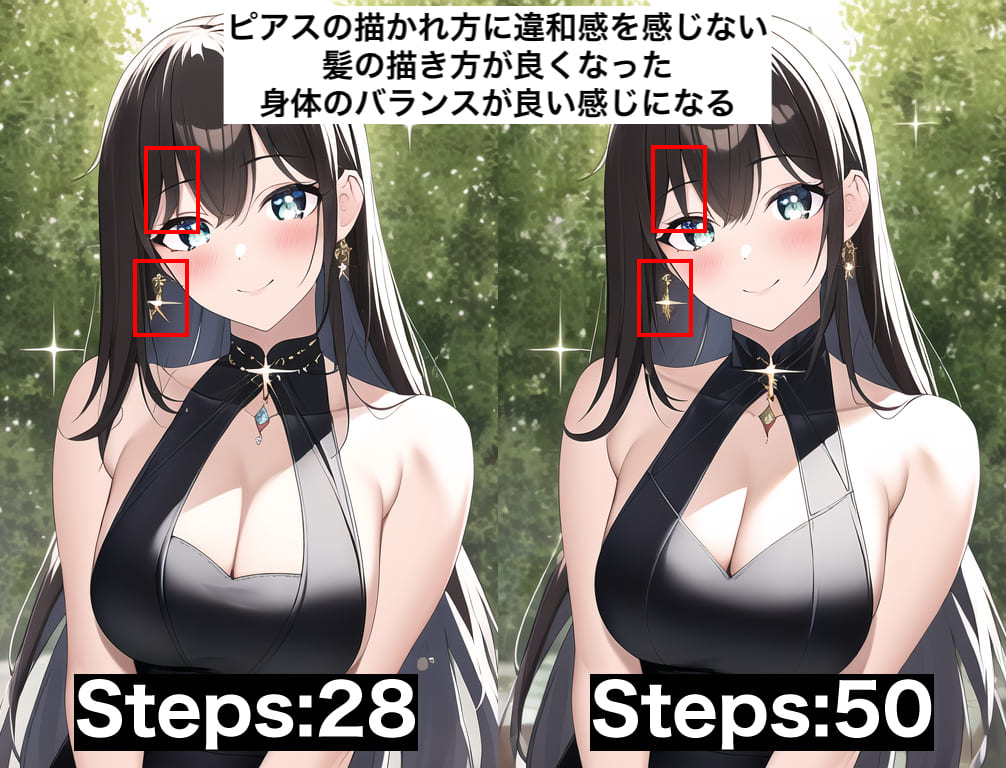
Steps28と50を比べてみると、数値50の方ではピアスの描かれ方に違和感を感じなくなっていたり、髪の描き方が良くなったり、身体のバランスがより整っていたりします。
初期設定では「28」になっているので「50」に設定することを推奨しますが、Anlas数の消費量は多くなるので要確認です。
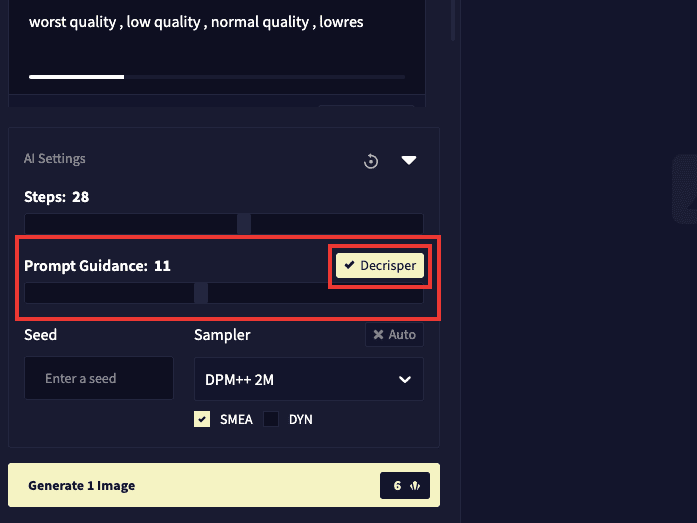
Prompt GuidanceとDecrisper
Prompt Guidanceはプロンプト内容にどれだけ従うかの影響度になります。
数値を低くするほど従わなくなり、数値を高くするほど従いやすくなる傾向にあります。
Decrisperはよく分かりません。
後ほどの比較画像で分かると思いますが、ONに設定するとOFFと違ったテイストの画像生成結果になりました。
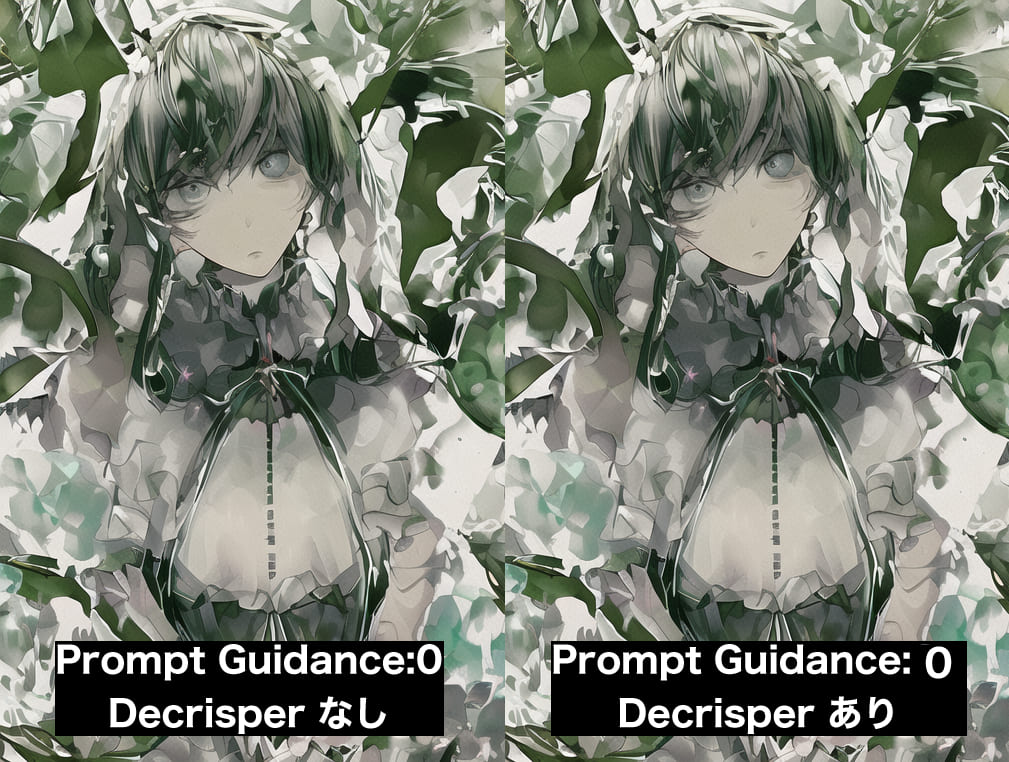
以下ではPrompt Guidanceを0に設定し、Decrisperを無しと有りで比較してみました。
同じような結果になりました。
Prompt Guidanceは0に設定すると想像できないような何かしらのアート性を感じる画像生成がされます。
アート系を作成したい人は0に近い数値にするといいかもしれません。
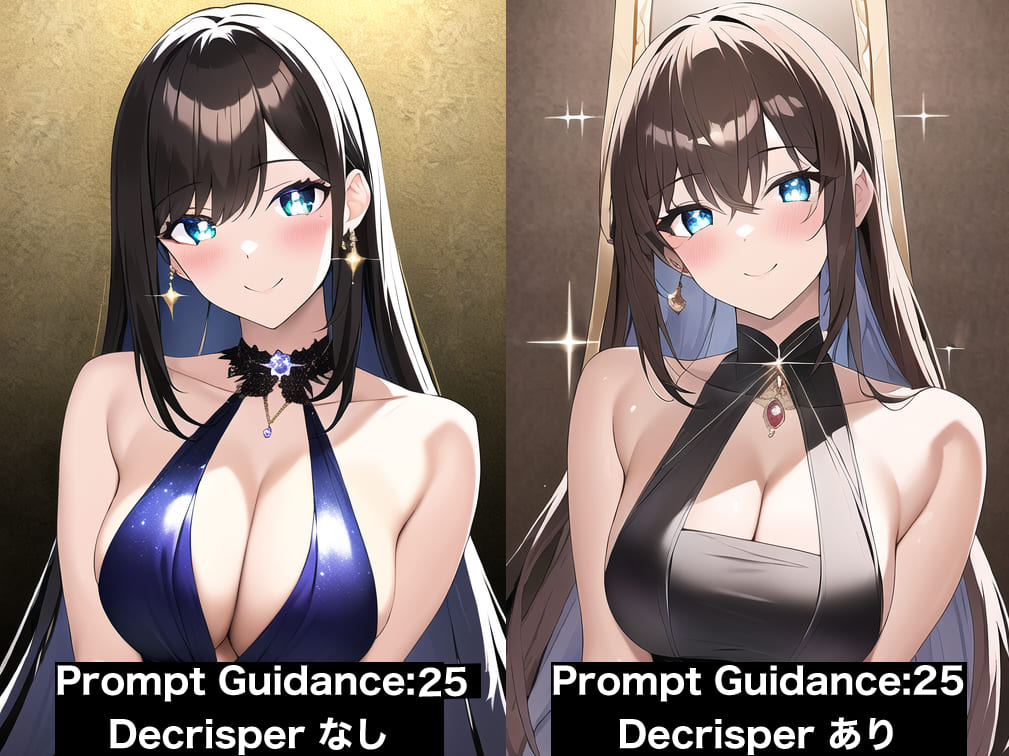
次はPrompt Guidanceを25に設定し、Decrisperを無しと有りで比較した画像になります。
少し違ったテイストでどちらも質の良い画像生成ができました。
プロンプト内容に従いやすくイメージに沿った画像生成をさせるために、Prompt Guidanceのオススメ設定値は10以上にした方がいいです。
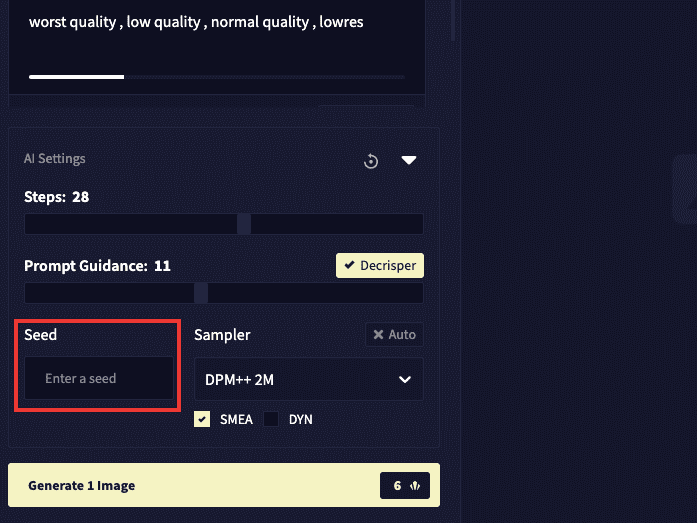
Seed
Seedを使用することで元の画像生成のポーズや画風などを引き継ぐことが出来ます。
使い方は左下にある「Seed」の場所に数値を入力します。
Seed値の確認方法は画像表示場所の右下にあります。
Seed値をクリックすることで左側にあるSeedの項目に値が自動で反映されます。

同じプロンプト内容でSeed値を固定し、画像サイズを変更してみると似たような特徴で別の画像に変わるので試してみてください。
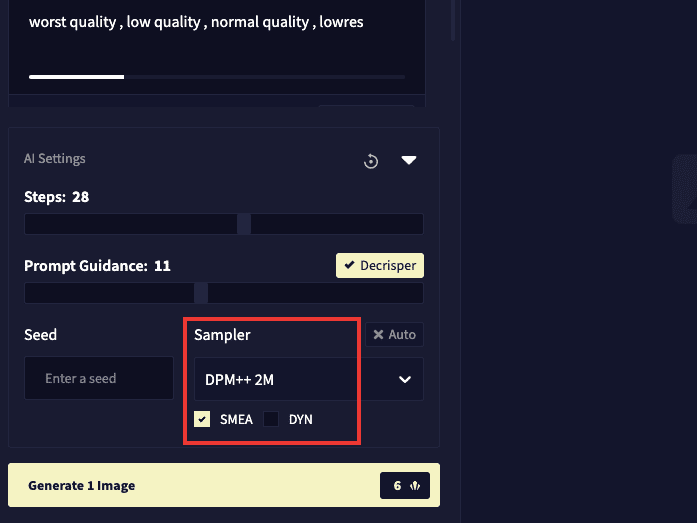
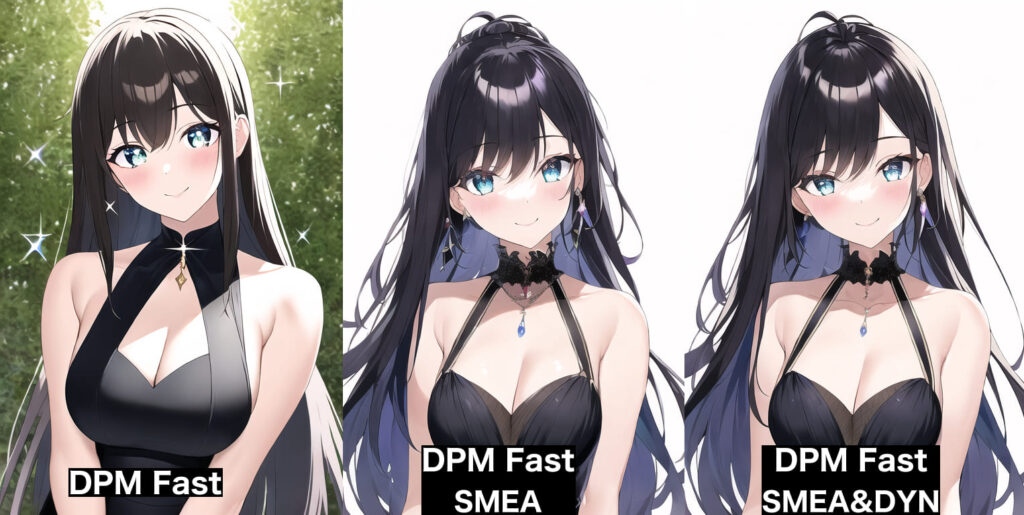
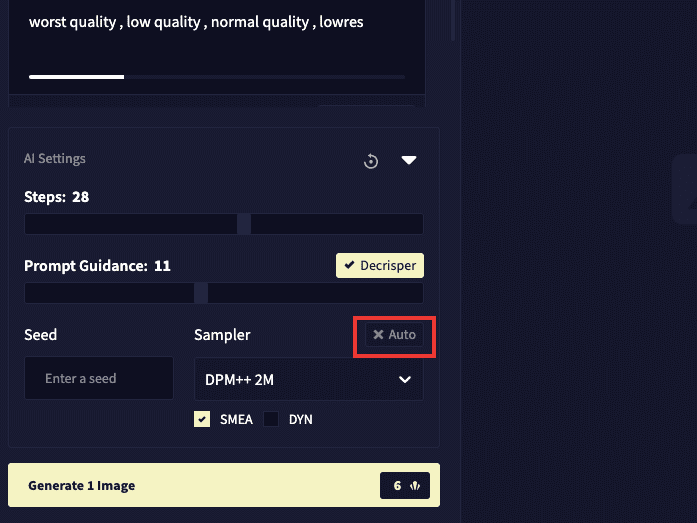
Sampler・SMEA・DYN
Samplerは画風が変わります。
特に大きく雰囲気が変わるのはSMEAを使用した場合になりますので使ってみた方がいいです。
SMEAは使用すると高解像度になり質の高い仕上がりになります。
DYNの機能を確認すると多様な画像出力を可能にしてくれるそうです。
Samplerは以下の8種類あります。
・DPM++2M
・Euler Ancestral
・Euler
・DPM2
・DPM++ 2S Ancestral
・DPM++ SDE
・DPM Fast
・DDIM
DDIMではSMEAの使用ができません。
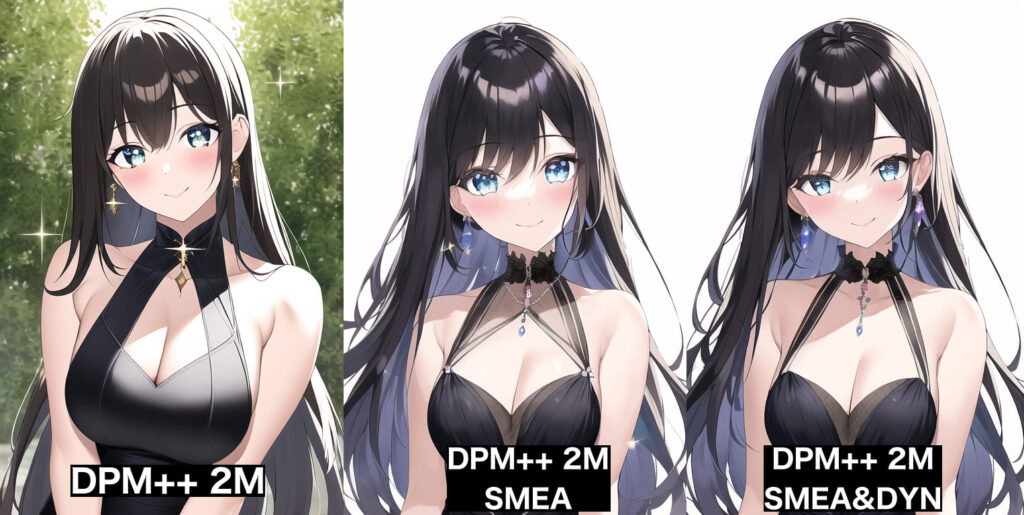
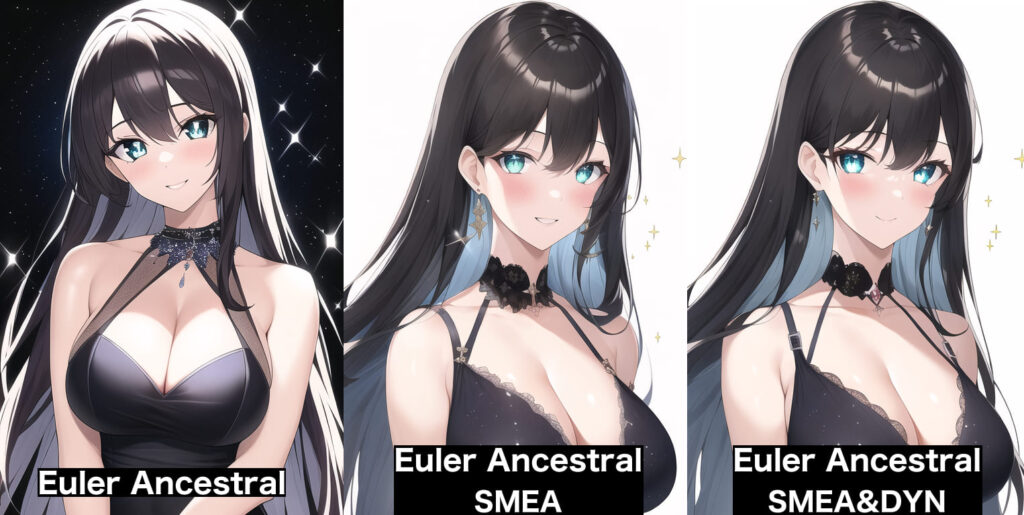
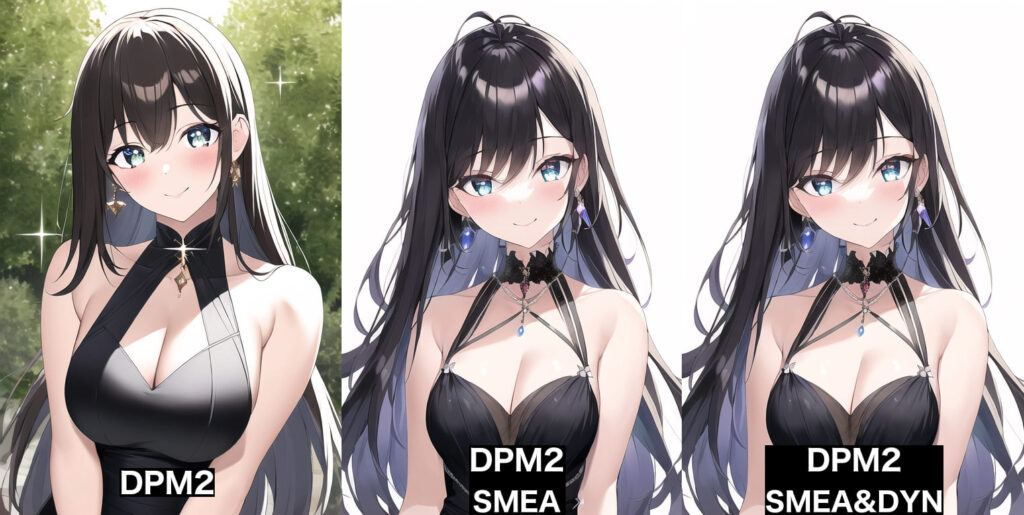
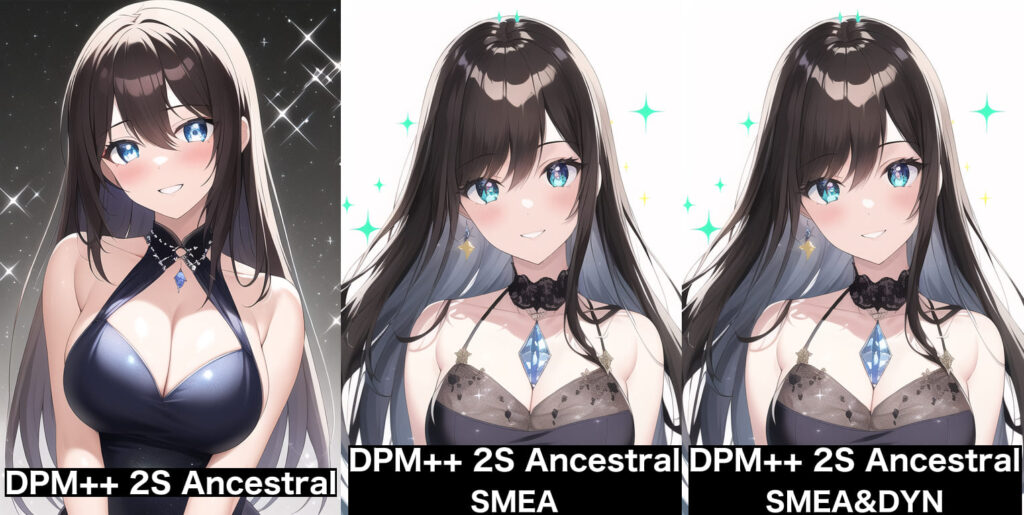
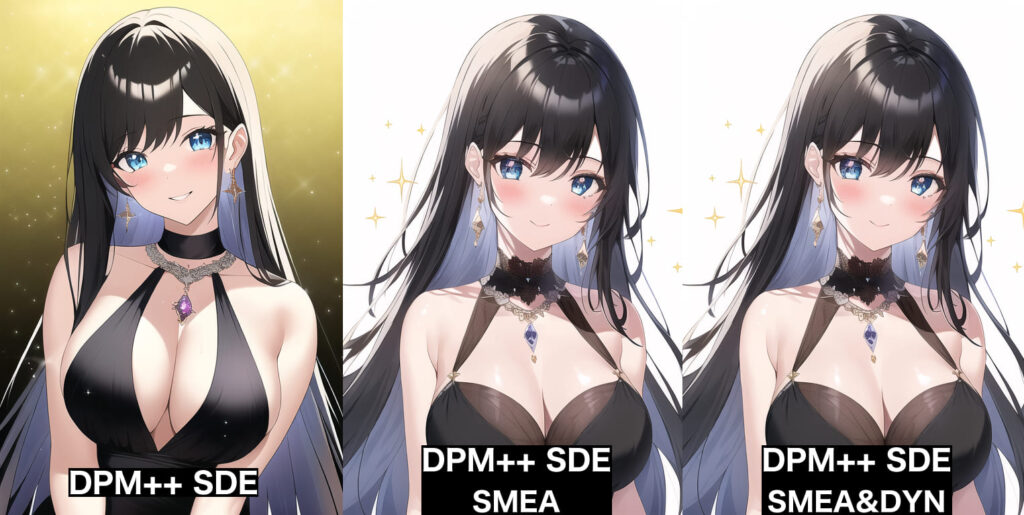
以下では全てのSampler、SMEAのみ使用、SMEAとDYNの2つを使用した場合の比較画像になります。
SMEAを使用すると大きく雰囲気が変わったのが分かります。
「DPM++ 2M」
「Euler Ancestral」
「Euler」
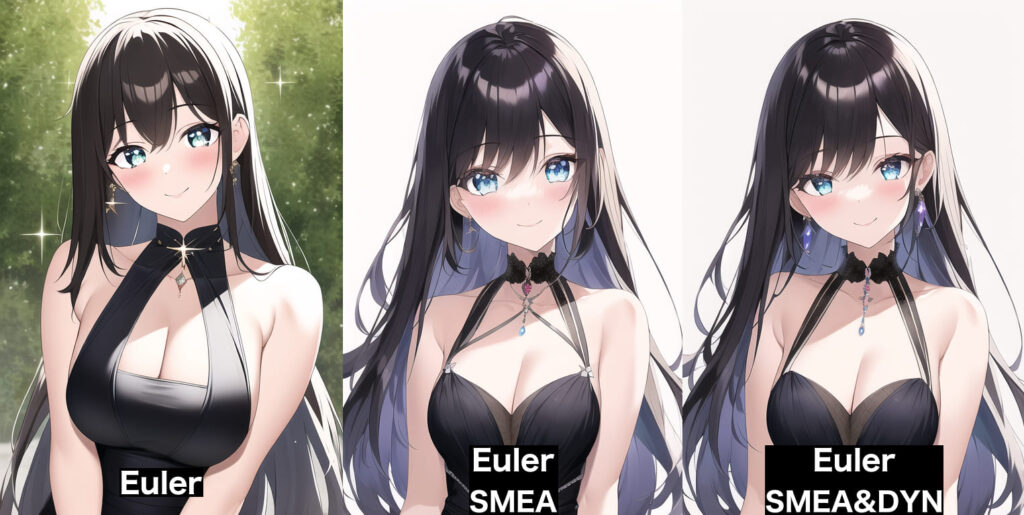
「DPM2」
「DPM++ 2S Ancestral」
「DPM++ SDE」
「DPM Fast」
「DDIM」
SMEAとDYNの設定ができません。
SMEAを使用してDYNは無しと有りの2つを比べた時に、DYNは有りにした方がバランスが整いやすく質が高い傾向にあると感じました。
私個人としてはSMEAを使用する時は同時にDYNもONにした方がいいと思います。
Auto
ONにすると決まったサイズ以上での生成で自動的にSMEAが使用されるスイッチになっています。
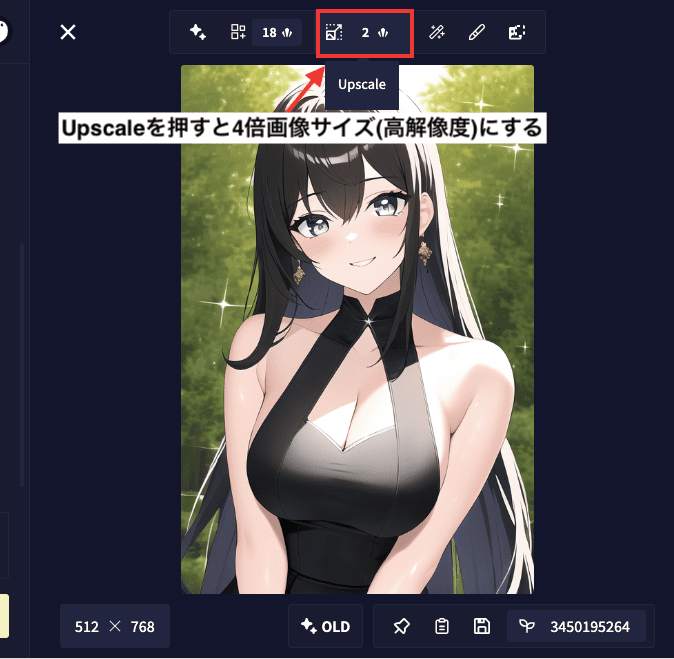
Upscale
アップスケールをすると画像サイズが4倍の大きさになります。
「512×768」ですと「2048×3072」の高解像度になります。
質をさらに高くする最終的な仕上げとして使用するといいです。
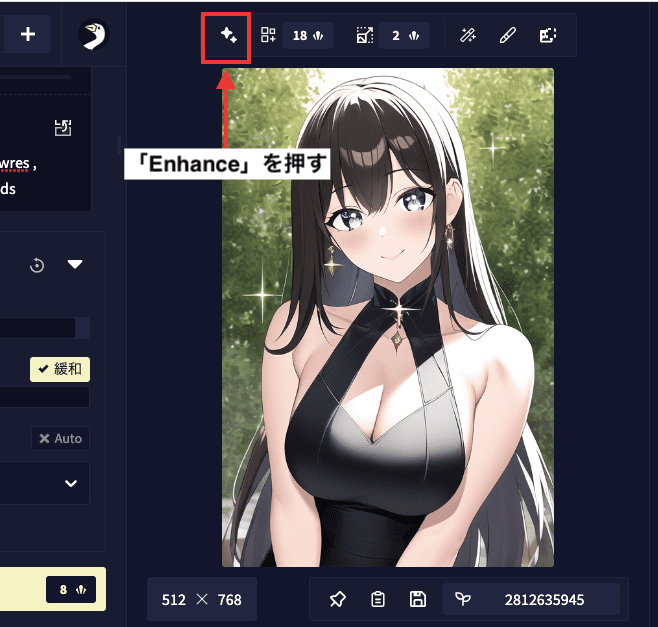
Enhance(強調)
画風の微調整をしたいのなら、画像表示にある左上のEnhance(強調)ボタンを押しましょう。
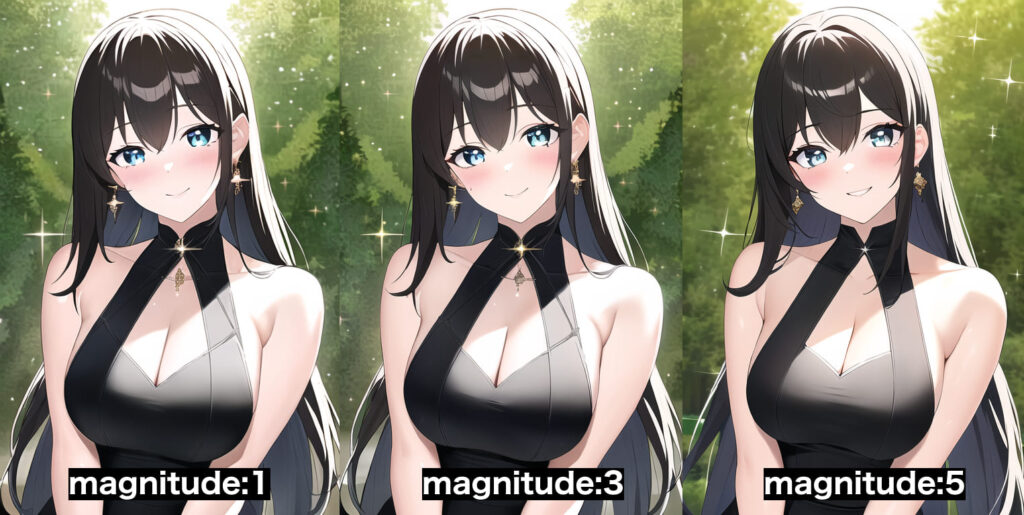
以下はmagnitudeの数値を「1」「3」「5」で生成した結果になります。
微妙に塗り方や髪の一部が変わっていたりします。
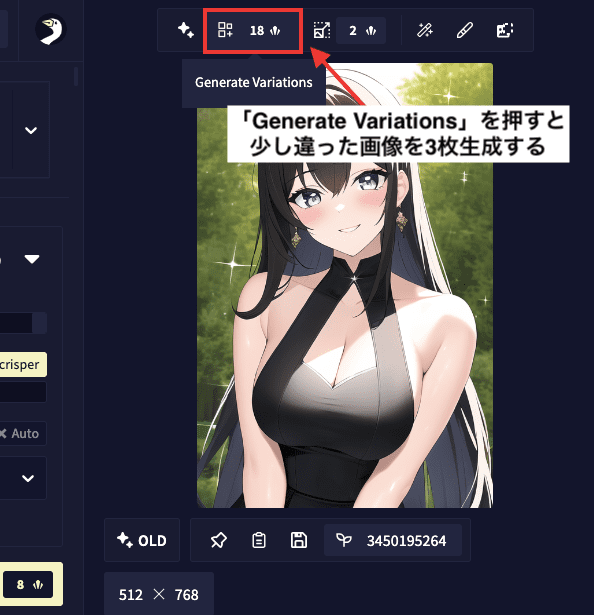
Generate Variations
Enhanceでは微妙な画風などの調整でしたが、Generate VariationsではEnhanceよりも違った画風にしてくれます。
新たに3枚画像生成してくれます。
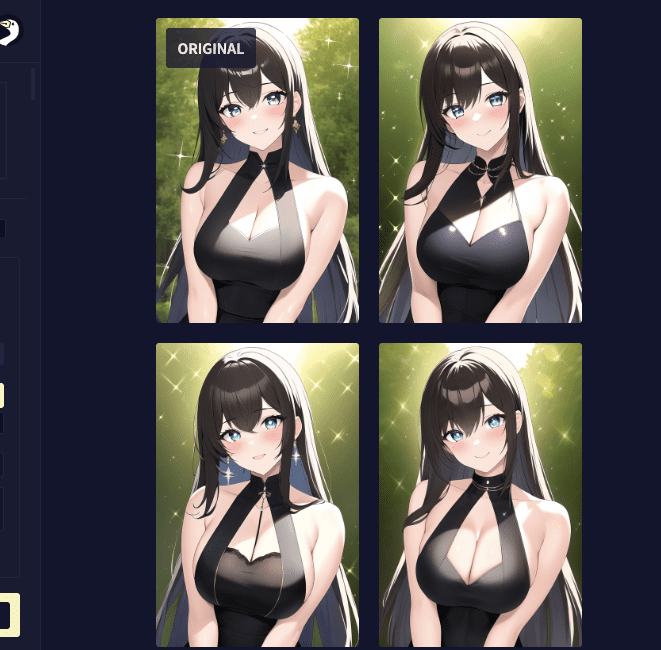
左上は元画像で残り3枚は新しく画像生成された結果になります。
顔の一部や塗り方、背景などが変わっています。
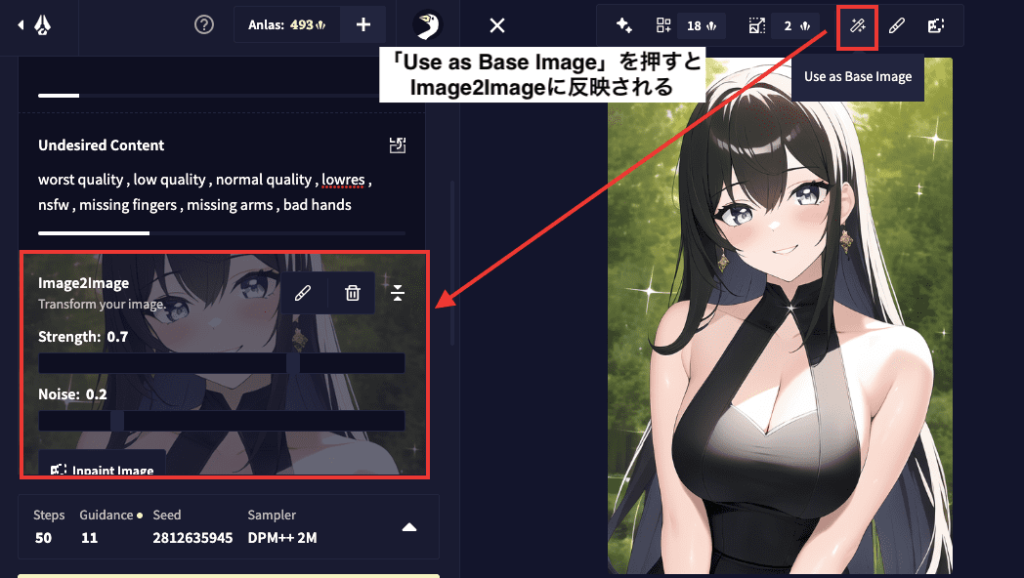
Use as Base Image
クリックすることで生成した画像をimage2imageに自動的に反映させることが出来ます。
まとめ
NovelAIの使い方について解説しました。
・商用利用可能
・スマホにも対応している
・テキストや画像から画像生成できる
・小説の生成も可能
Stable diffusionと比べてもクオリティは同じくらい高いので
NovelAIはおすすめです!