「Stable Cascadeを使って画像生成したいけど、どうやって導入できるのか全く分からない」
と困っていませんか?
Stable Cascadeを使う1つの方法として
ComfyUIを使って導入するやり方があります。
コピペするだけで簡単にStable Cascadeを導入できるサンプルコードを用意しているので
是非参考にして画像生成してみてください!
この記事では、Google Colabを使ってComfyUIでStable Cascadeの導入方法から画像生成する方法までを解説します。
4つのファイルのダウンロードURLを取得する

Stable Cascadeでは、次の4つのファイルのダウンロードURLを取得する必要があります。
①stage_a.safetensors
②stage_b_bf16.safetensors
③stage_c_bf16.safetensors
④model.safetensors
上記4つのファイルは、全て「Hugging Face」にあるStabilityAIのアカウントからダウンロードURLを取得することができます。
以下のリンクからダウンロードURLを取得することができます。

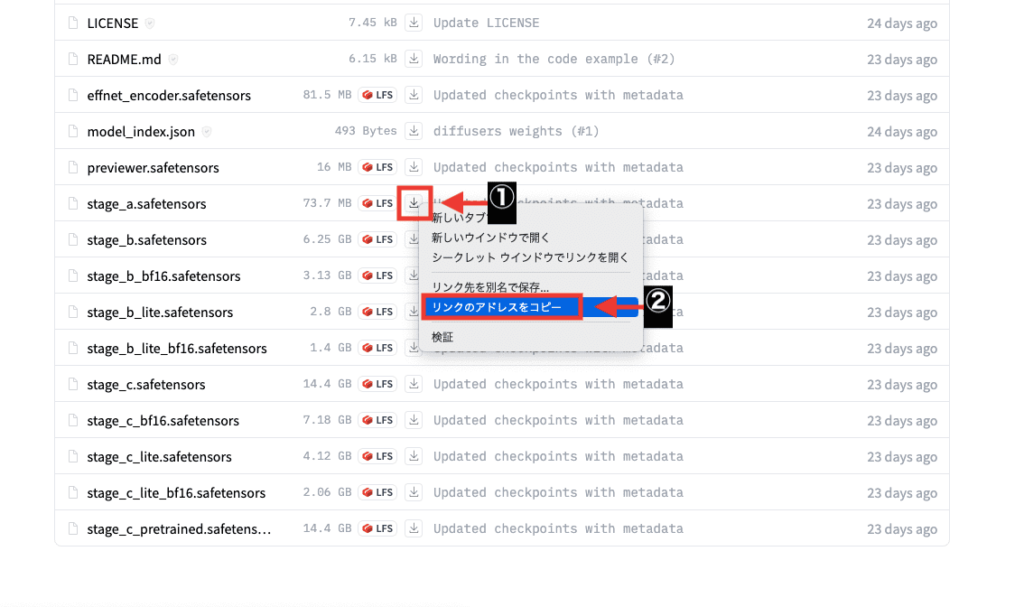
アクセスしたら「stage_a.safetensors」「stage_b_bf16.safetensors」「stage_c_bf16.safetensors」の3つのファイルがあるので、それぞれダウンロードURLを取得します。

ダウンロードURLを取得するには、「ダウンロード」アイコンを右クリックしてください。
Google Chromeを使っている方は、「リンクのアドレスをコピー」をクリックすることで取得できます。
ダウンロードURLはGoogle Colabのコード内で導入するときに必要になりますが
後でコピペで使えるコードを教えるので、コピーする作業は別に行わなくても結構です。
もう1つのファイルもダウンロードURLを取得する必要があります。
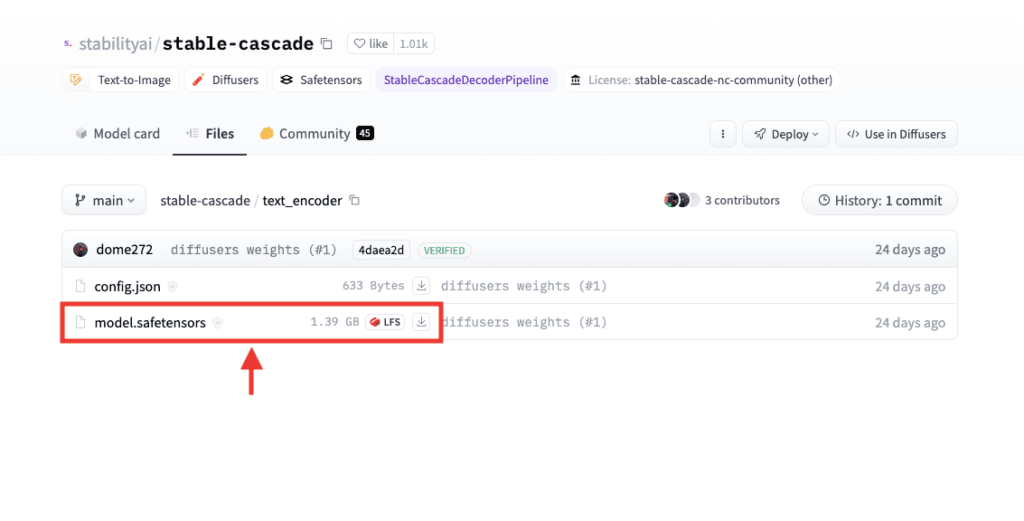
「text_encoder」をクリックしてください。
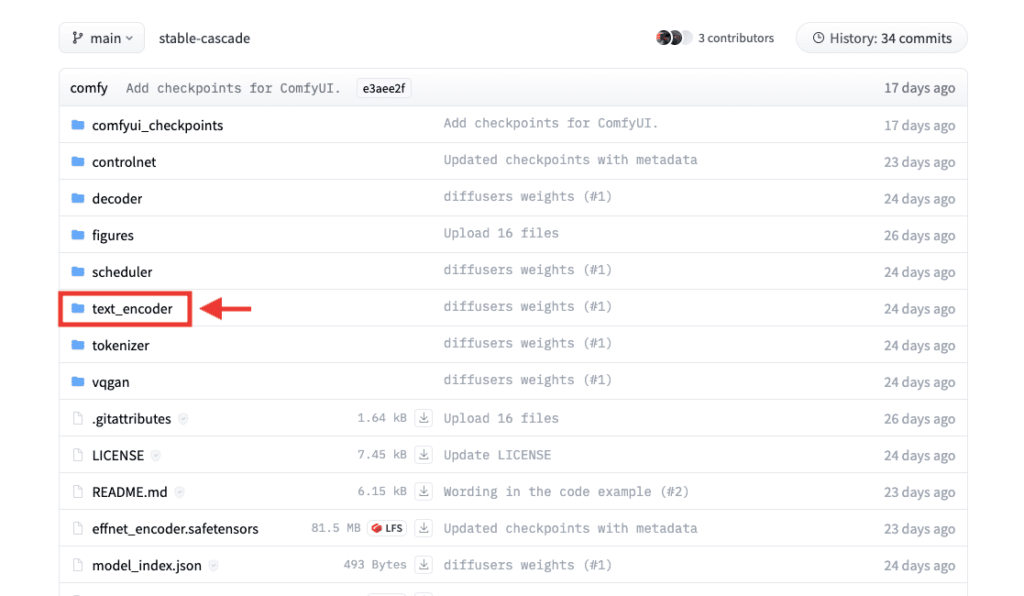
「model.safetensors」があるのでダウンロードURLを取得してください。
Stable Cascadeのコードを導入する

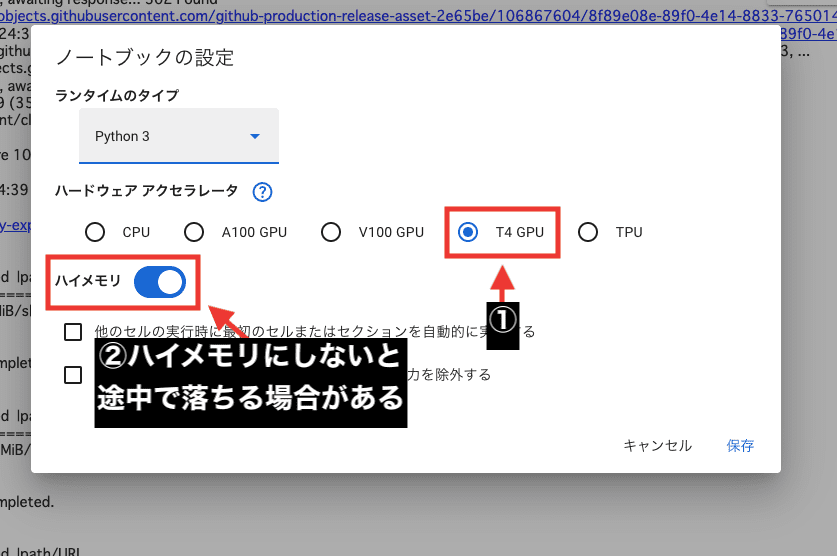
Google Colabにアクセスしてから
「ノートブックの設定」で「T4 GPU」を選択してから
「ハイメモリ」のトグルをオンに設定してください。
「ハイメモリ」をオンにしないと、生成中に自動で終了してしまい画像生成できない場合があります。
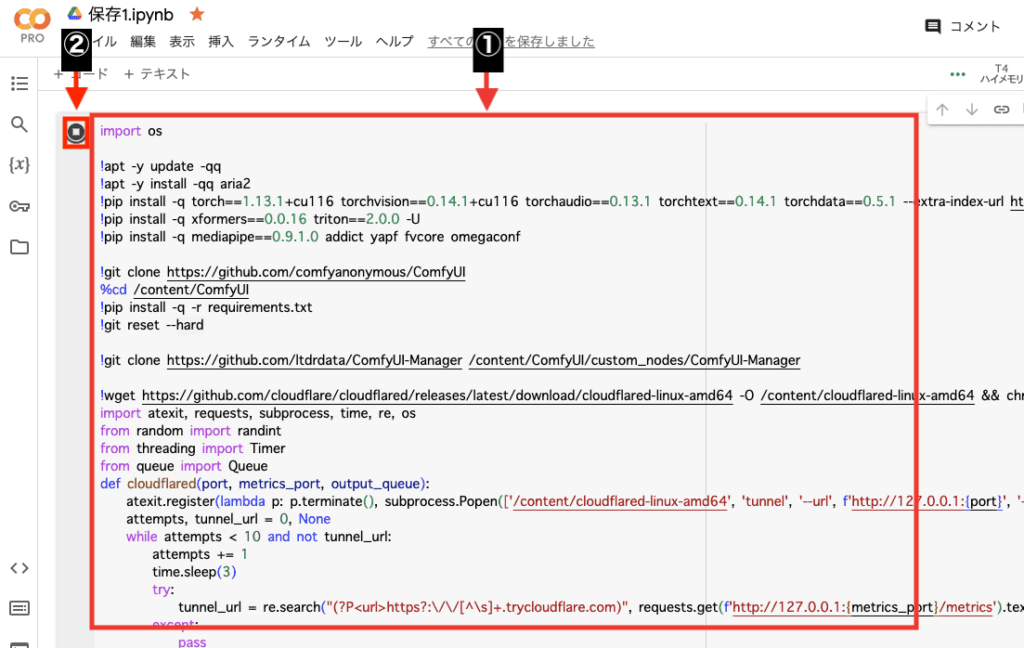
Google Colabのコード内に以下のコードをコピペしてください。
import os

!apt -y update -qq
!apt -y install -qq aria2
!pip install -q torch==1.13.1+cu116 torchvision==0.14.1+cu116 torchaudio==0.13.1 torchtext==0.14.1 torchdata==0.5.1 --extra-index-url https://download.pytorch.org/whl/cu116 -U
!pip install -q xformers==0.0.16 triton==2.0.0 -U
!pip install -q mediapipe==0.9.1.0 addict yapf fvcore omegaconf

!git clone https://github.com/comfyanonymous/ComfyUI
%cd /content/ComfyUI
!pip install -q -r requirements.txt
!git reset --hard

!git clone https://github.com/ltdrdata/ComfyUI-Manager /content/ComfyUI/custom_nodes/ComfyUI-Manager

!wget https://github.com/cloudflare/cloudflared/releases/latest/download/cloudflared-linux-amd64 -O /content/cloudflared-linux-amd64 && chmod 777 /content/cloudflared-linux-amd64
import atexit, requests, subprocess, time, re, os
from random import randint
from threading import Timer
from queue import Queue
def cloudflared(port, metrics_port, output_queue):
    atexit.register(lambda p: p.terminate(), subprocess.Popen(['/content/cloudflared-linux-amd64', 'tunnel', '--url', f'http://127.0.0.1:{port}', '--metrics', f'127.0.0.1:{metrics_port}'], stdout=subprocess.DEVNULL, stderr=subprocess.STDOUT))
    attempts, tunnel_url = 0, None
    while attempts < 10 and not tunnel_url:
        attempts += 1
        time.sleep(3)
        try:
            tunnel_url = re.search("(?P<url>https?:\/\/[^\s]+.trycloudflare.com)", requests.get(f'http://127.0.0.1:{metrics_port}/metrics').text).group("url")
        except:
            pass
    if not tunnel_url:
        raise Exception("Can't connect to Cloudflare Edge")
    output_queue.put(tunnel_url)
output_queue, metrics_port = Queue(), randint(8100, 9000)
thread = Timer(2, cloudflared, args=(8188, metrics_port, output_queue))
thread.start()
thread.join()
tunnel_url = output_queue.get()
os.environ['webui_url'] = tunnel_url
print(tunnel_url)


#stage_a
!aria2c --console-log-level=error -c -x 16 -s 16 -k 1M https://huggingface.co/stabilityai/stable-cascade/resolve/main/stage_a.safetensors?download=true -d /content/ComfyUI/models/vae -o stage_a.safetensors

#stage_b_bf16
!aria2c --console-log-level=error -c -x 16 -s 16 -k 1M https://huggingface.co/stabilityai/stable-cascade/resolve/main/stage_b_bf16.safetensors?download=true -d /content/ComfyUI/models/unet -o stage_b_bf16.safetensors

#stage_c_bf16
!aria2c --console-log-level=error -c -x 16 -s 16 -k 1M https://huggingface.co/stabilityai/stable-cascade/resolve/main/stage_c_bf16.safetensors?download=true -d /content/ComfyUI/models/unet -o stage_c_bf16.safetensors

#model.safetensors
!aria2c --console-log-level=error -c -x 16 -s 16 -k 1M https://huggingface.co/stabilityai/stable-cascade/resolve/main/text_encoder/model.safetensors?download=true -d /content/ComfyUI/models/clip -o model.safetensors

!python main.py --dont-print-server
コードをコピペしたら実行ボタンをクリックしてください。
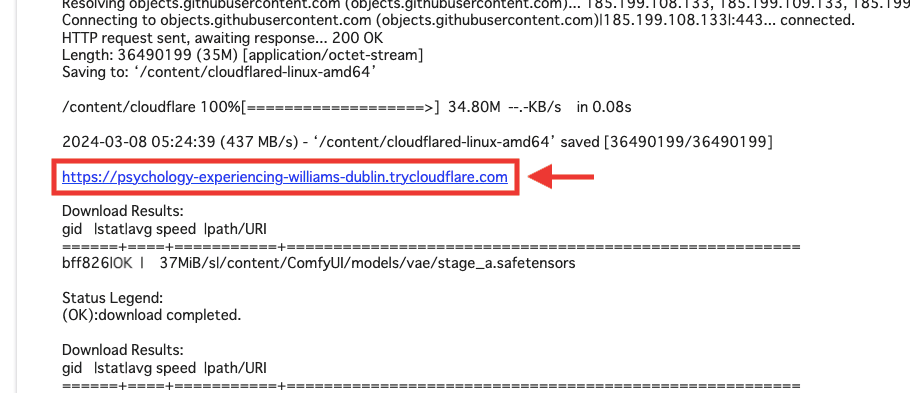
コードの下付近に「trycloudflare.com」のURLが表示されるので、クリックしてComfyUIを起動してください。
Stable Cascadeを使って画像生成する

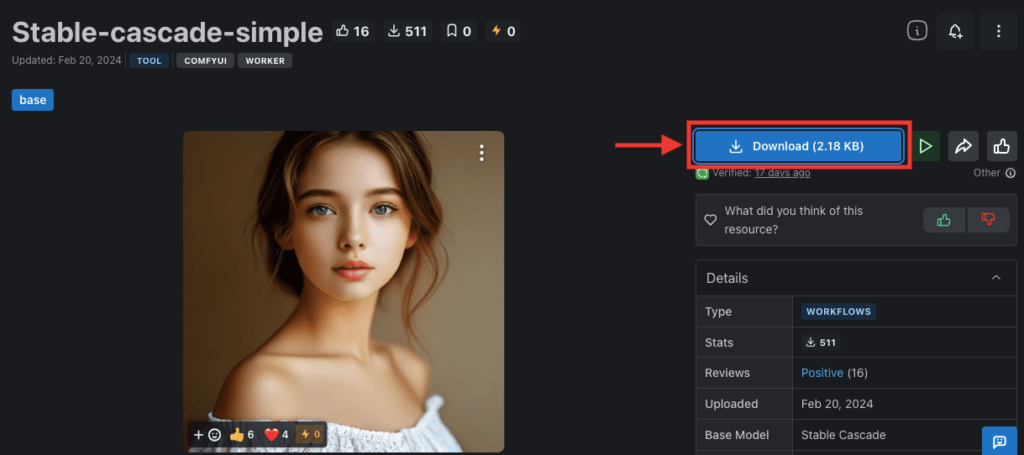
ComfyUIを起動したら、次はStable Cascadeを使って画像生成するためのworkflow(jsonファイル)をダウンロードします。
workflowは、CivitAIにある以下のリンクからダウンロードすることが出来るのでアクセスしてください。
「Download」をクリックしてjsonファイルをダウンロードしてください。
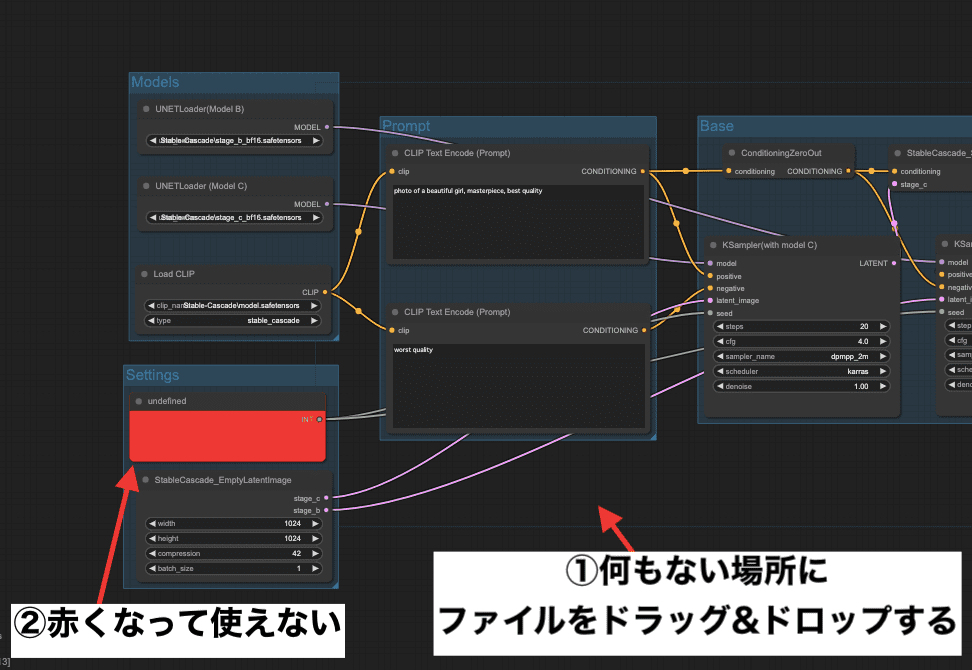
ComfyUIに、ダウンロードしたjsonファイルを
何もないところにドラッグ&ドロップしてください。
すると、1つの部分だけ赤く表示されてエラーが出ます。
これはノードが足りていないと表示されるエラーとなっています。
このままではまだ画像生成できませんから、エラーになっている赤い部分のノードを追加します。
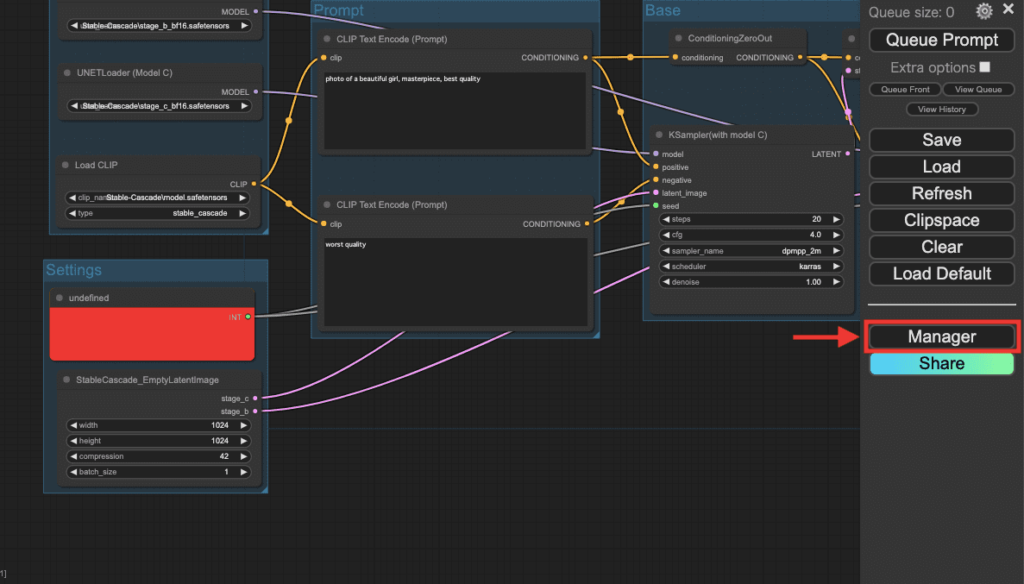
右側にある「Manager」をクリックしてください。
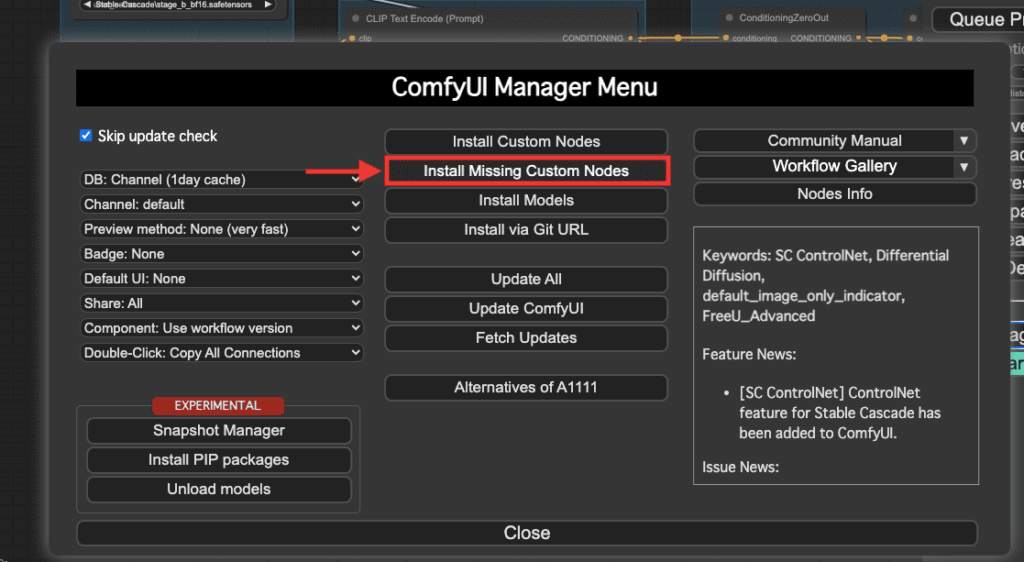
「Install Missin Custom Nodes」をクリックしてください。
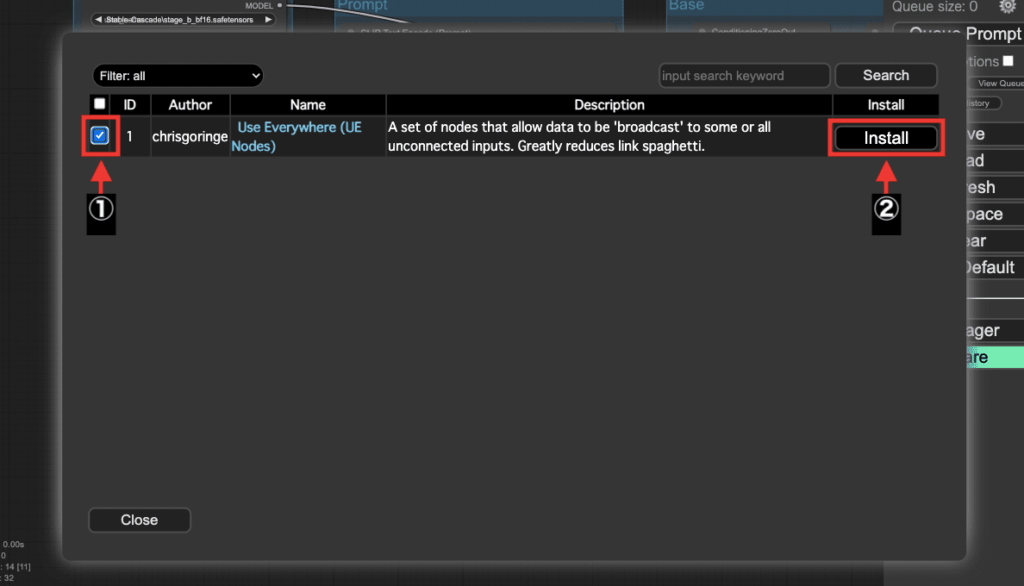
足りていないノードが表示されるので
左側にあるチェックをつけてから
右側にある「Install」をクリックしてください。
「RESTART」をクリックすると、インストールしたノードを適用することができます。
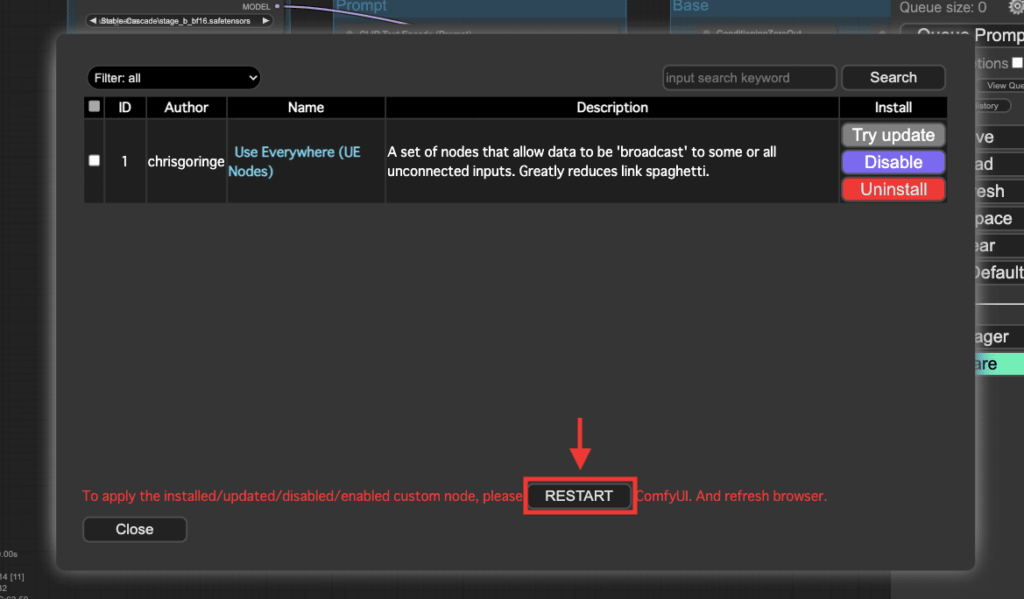
念の為に右側にある「Refresh」もクリックしてComfyUIを更新してください。
それでも反映されない場合はページを再読み込みしてください。
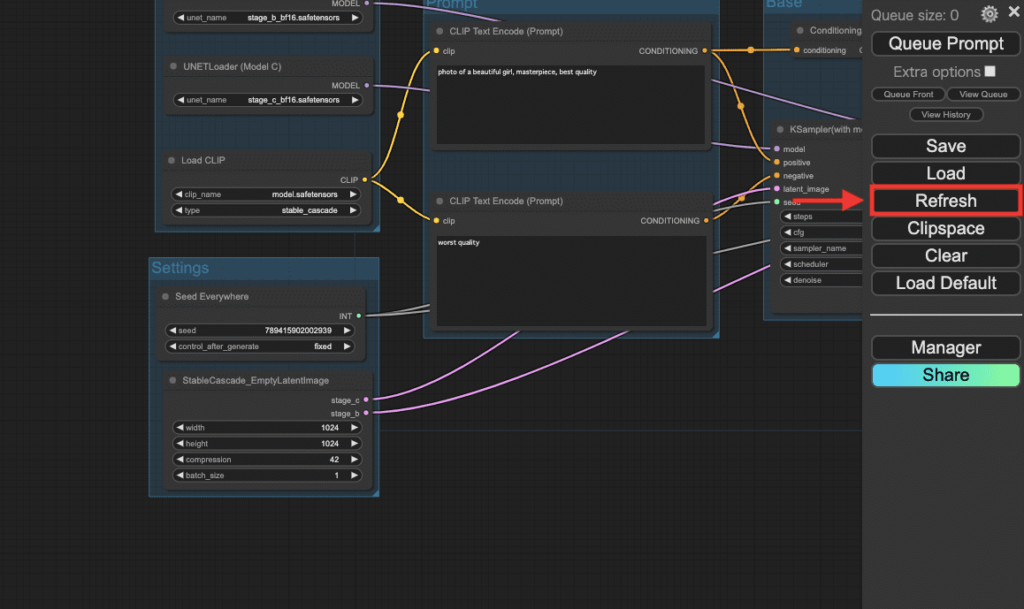
これで赤く表示されていた場所に自動でノードが設定されるようになり、エラーがなくなります。
反映されるまで1分くらいかかる場合があります。
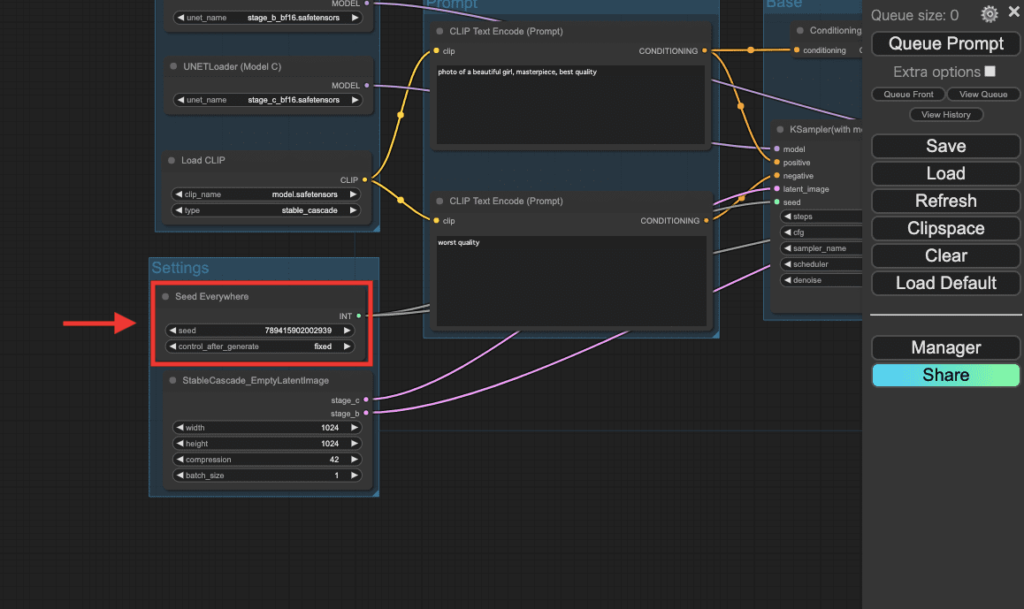
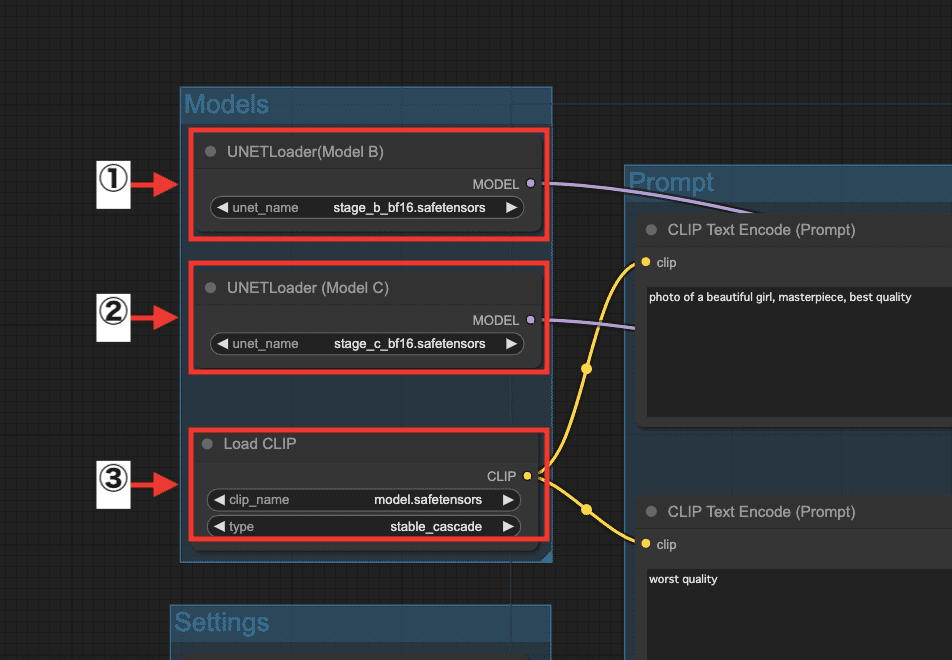
以下の手順に沿って設定してください。
①「UNETLoader(Model B)」の項目内で、「stage_b_bf16.safetensors」を選択する
②「UNETLoader(Model C)」の項目内で、「stage_c_bf16.safetensors」を選択する
③「Load CLIP」の項目内で、「model.safetensors」を選択する
「Load VAE(Model A)」の項目内で、「stage_a.safetensors」を選択してください。

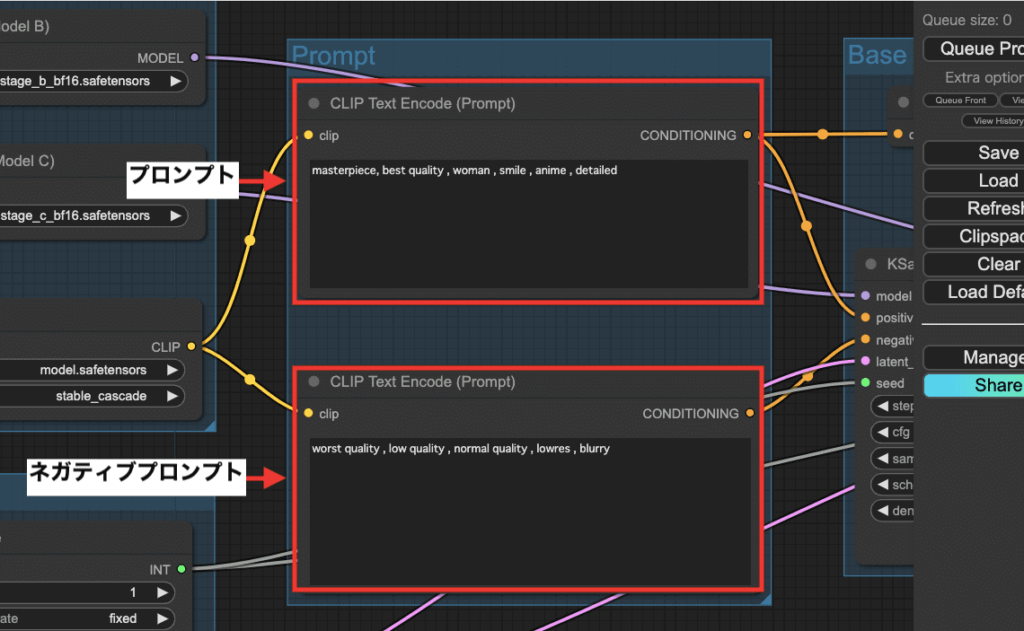
上部にある「CLIP Text Encode(Prompt)」内ではプロンプトになっているので、画像生成したい内容を入力してください。
下部にある「CLIP Text Encode(Prompt)」内ではネガティブプロンプトになっているので、画像生成したくない内容を入力してください。
この例では、プロンプト内にアニメ風の女性で画像生成するように入力しています。
masterpiece , best quality , woman , smile , anime , detailed
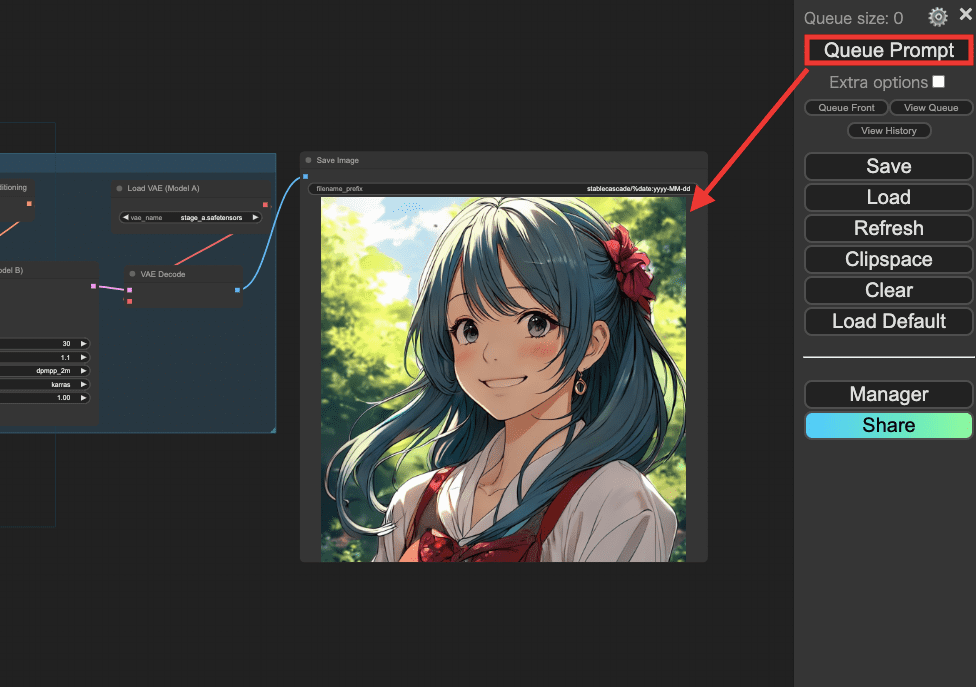
「Queue Prompt」をクリックすることで、Stable Cascadeを使用した画像生成をすることができます。
以下の画像のように、クオリティが高いアニメ風の女性で画像生成することができます。
是非参考にしてStable Cascadeを使用してみてください。
まとめ

ComfyUIでStable Cascadeを使用する方法について解説しました。
・Stable Cascadeを使用するための4つのファイルのダウンロードURLを取得する
・Google Colab内にStable Cascadeを導入するコードを入力する
・ComfyUIでStable Cascadeを使用するためのworkflowをCIVITAIからダウンロードして導入する
是非参考にしてStable Cascadeで画像生成してみてください。